Quantcast
Channel: Printmaking – Jackson's Art Blog
Viewing all 92 articles
Browse latest View live

National Original Print Exhibition at Bankside Gallery

$
0
0

The National Original Print Exhibition 2017 runs from 20th September to 1 October 2017 at Bankside Gallery on London’s South Bank. The exhibition seeks to show the best in contemporary printmaking, and is run by the RE, the Royal Society of Painter-Printmakers. At Jackson’s we have been looking forward to the show for several months, so with the exhibition opening this week, we spoke to two of the selectors, Trevor Price (Vice President of the RE) and Mychael Barratt (President of the RE), about the make-up of the exhibition and the picture it gives of contemporary printmaking.


Duncan Montgomery: Hi Mychael, thanks for talking to us about NOPE. Were there any entries (or entrants) that particularly stood out for you or were especially to your taste?

Mychael Barratt: Every year there is an abundance of works that particularly stand out. The scale and exact techniques are not always apparent from digital files so there is a proper delight in receiving the physical entries. One in particular that struck me was by a large monochromatic linocut called An Offer of Love, which is a collaborative work by Ade Adesina and June Carey. The detail and level of work that has gone into this piece is breathtaking. There was another collaborative landscape by a group called Pine Feroda that is equally monumental. I also was very struck by Paint the Town Red by Heather Meyerratken which is of a street scene in Havana. It is printed on wire mesh, which is a technique that I have never seen before.

Margot Rood, ‘Portugese Melons’ (Arabic Gum bichromate print).


Liz K miller, ‘Circular Score #5’ (Etching).


DM: Were there any prevailing themes amongst the entries, or amongst the selected works?

MB: When we are judging, we often notice a prevailing theme in the entries but that does not necessarily correspond to the work that makes it to the walls of the exhibition. Some curious zeitgeist affects artists so that one year, I remember that there were a huge number of entries containing crows. Another year it was skulls. I’m not sure if any crows or skulls were actually selected, however…

DM: What is the balance like between traditional and innovative or experimental printmaking in this year’s show?

MB: Very interesting question. I’ve taken a proper look at the show with this question in mind and I honestly think that it’s 50/50 between traditional and innovative. I also have no preference between the two. What I find really exciting is when artists use conventional techniques to create offbeat pieces. One artist has used conventional printmaking but printed on torn off hardcover book jackets to create one-off pieces. Another artist printed silkscreens onto a ceramic cube while yet another wrapped his print around a lampshade. Always some surprises!

Louise Davies, ‘Shadows on the Moors’ (Etching and collagraph).


Grigory Babich, ‘Dance with Puppet’ (Wood engraving and Linocut).


DM: Hi Trevor, thanks for taking the time to chat to us about the National Original Print Exhibition 2017. How do you deal with the pressures of being a selector? I imagine it must be a very difficult process.

Trevor Price: Selecting for the National Original Print Exhibition was a hugely positive but exhausting time. I saw a lot of high quality printmaking and the resulting exhibition shows printmaking to be in a very good place at the moment.

DM: If you had to pick one work from the exhibition for your own collection, what would it be?

TP: There is more than one I would like to take home for my personal collection. However if I had to choose just one it would be Liz Miller’s intaglio print that included inking up an old vinyl record. The resulting image [shown above] felt like an an abstracted music score.

Fae Kilburn, ‘All was lost’ (Gum arabic print).


Kirsten Van Schreven, ‘Airframe V’ (Drypoint etching).


The National Original Print Exhibition 2017 runs from 20th September to 1 October at Bankside Gallery, 48 Hopton Street, London SE1 9JH.

The image at the top of this article is ‘White Vans on the M4’, a wood engraving by Sally Hands.

The post National Original Print Exhibition at Bankside Gallery appeared first on Jackson's Art Blog.


Linocut Cardmaking Inspiration

$
0
0
It has become an annual tradition at Jackson’s!
Each year we ask artists to submit a photo that will encourage people to make their own linocut Christmas Cards. Since there are so many lovely, skilled printmakers on Twitter we always do the photo competition there. Every year we get some great photos from creative artists.

The Winning Photo

This year we have a winning image from Andrea Clement that will feature in our newsletter about printing your own cards. In addition to it being a beautiful card design it is a great photo layout for inspiring cardmaking, with the carved lino block, the tools and the multiple printed cards all showing. Thanks Andrea, we think your great photo will inspire people to try making cards this year! Andrea will receive a £50 Jackson’s gift voucher.
We have also commended the really good photos from eight artists who will each receive a tube of Caligo Safewash Relief Ink.

Andrea Clement’s @Andreajane71 great photo of linoprint cardmaking – a folk-themed dove design.

Andrea also submitted another beautiful photo that also uses large areas of blue ink to set off the snow-coloured paper, to great effect!

Andrea Clement’s @Andreajane71 second design – Polar Bear


Runner-up Highly Commended Photos

More creative cards using linocut printmaking!

Veronica Butt‏ @Vickywicks538
Happy Christmas Chickens!

Veronica Butt‏ @Vickywicks538
Christmas Chickens 2017! Going jolly Red!

Tina Hagger‏ @haggytea
The tricky Puffin who tested my printmaking patience straggling at the back as usual!
Note the Important Orange pencil!

Tina Hagger‏ @haggytea
Phathlo Blue depiction of my local creek, Oyster House & a Thames Barge in a Snowglobe.

Tina Hagger‏ @haggytea
Glistening black ink and snowy black skies.

Lynne Fornieles @silentscyther
Four cards – dogs and snowmen!

Rachel Willock‏ @rackel22
‘Meowy Christmas’

Louise Webb‏ @off_thepress
Some work-in-progress card printing. I love the mistletoe in the pear shape!

Louise Thompson‏ @LouThompsonBA
Peace dove with different papers and inks.

Chris Pendleton‏ @CWPendleton
Great polar bear!

Melanie Hunt‏ @mortelover
Great skill with a rainbow roll ink gradient!

Melanie Hunt‏ @mortelover
A lovely rainbow roll ink gradient!


Make Your Own Cards

We hope these great examples of printmaking will encourage you to have a go at making your own linocut Christmas Cards this year!

Here are earlier blog posts that might help with the technical aspects:

How to Make Your Own Linocut Christmas Cards.

Create Your Own Festive Cards Using Lino Print


Click on the underlined link to go to the Printmaking Department on the Jackson’s Art Supplies website.
Postage on orders shipped standard to mainland UK addresses is free for orders of £39 or more.

The post Linocut Cardmaking Inspiration appeared first on Jackson's Art Blog.

A Look Inside ‘House of Cards’ by Sarah Hamilton

$
0
0
If you would like to make handmade cards for your friends and family this winter but don’t know which medium to use, Sarah Hamilton’s book ‘House of Cards: Step-by-Step Projects for Beautiful Handmade Greetings Cards‘ will provide plenty of inspiration.

The book is organised around ten projects, each of which is executed in a different style, in a different medium, by a different artist. The projects are as follows:

  • Sarah Hamilton: Silkscreen Printing
  • Lynn Giunta: Decoupage
  • Sarah Morpeth: Papercutting
  • Sam Marshall: Linocut Printing
  • Kirsty Elson: Found Objects
  • Gabriela Szulman: Collage
  • Lucy Featherstone: Handstitch Art
  • Jessica Hogarth: Digital Illustration
  • Anna Jackson: Textile Foiling
  • Kathryn Hunter: Letterpress Printing

Each of these projects starts by introducing the artist and the medium. This section leads into a short step-by-step guide which covers 3 or 4 page spreads. Each step is illustrated with helpful photographs which complement the text well. The book as a whole is very well-illustrated and sumptuously-produced – it’s almost a coffee-table book.

Page spread pp.62-63 of Sarah Hamilton’s ‘House of Cards’; Sam Marshall’s lesson on linocut. Readers interested in creating their own linocut cards might like to read our blog post on the topic.


What I really enjoyed about the book was the combination of card-making history with practical projects. It’s great to be able to read Jakki Brown’s history of Victorian Christmas cards and then to flick forward a few pages to see the work of contemporary card-makers. The book has a very useful introduction; Sarah Hamilton even provides some advice for artists who want to start selling their cards commercially, or selling their card designs to companies for wider distribution.

It’s also great that many of the projects detailed in this book can be completed without the need to invest in expensive equipment; many of them make use of art supplies most people will already have around the house, such as tracing paper, tissue paper, pencils and PVA. (One of the lessons is in using ‘found objects’ to create imaginative cards.) I was surprised to see digital illustration among the ‘traditional’ card-making media; you’ll need Adobe Photoshop and Illustrator to follow along with that tutorial, by Jessica Hogarth. If you have these programmes but have barely used them, don’t worry; the tutorial includes a lot of screenshots and you don’t need to be a whizz on Photoshop to follow the lesson.

Overall, this is a handsome and well-illustrated manual which will provide inspiration and instruction to many would-be card artists. The step-by-step tutorials are easy to follow and the images clear up any potential confusion. It’s worth noting that the sample page spreads we have featured on this page have not been selected because they are especially well illustrated; every page of this book is crammed with pictures.

Page spread pp.50 – 51 from Sarah Hamilton’s ‘House of Cards’, a profile of the papercutting artist Sarah Morpeth.


Page spread pp.44 – 45 from Sarah Hamilton’s ‘House of Cards’, a tutorial on decoupage.


Sarah Hamilton’s ‘House of Cards‘ is available from Jackson’s Art Supplies. If you would like more information about making your own Linocut greetings cards, you might want to take a look at our instructional article ‘How to make your own linocut Christmas cards’.

The post A Look Inside ‘House of Cards’ by Sarah Hamilton appeared first on Jackson's Art Blog.

How to Make Your Own Wood Engravings for Christmas or Greetings Cards

$
0
0
Wood engraving is a relief printmaking technique, like linocut or potato-printing. It’s not the easiest technique to get the hang of, but it’s a very versatile medium, and because the wood used is resilient, it is possible to run off a nearly unlimited number of prints. This makes it the perfect medium for creating Christmas or greetings cards; once the block has been cut, it can be used year-on-year.

Before I begin, a disclaimer. Wood engraving is a complex process – far too complex to tackle in a single blog post. I will only cover the basics: what tools you will need; how to darken the block; how to use the tools; and how to print by hand. Interested readers might want to read the instructional manual “Wood Engraving & Linocutting” by Anne Hayward, which I reviewed for the Jackson’s Blog last year, or Simon Brett’s book, ‘Wood Engraving: How to Do It’. These books (or any of the manuals published in the early- or mid-Twentieth century) will give a fuller introduction than is possible here.

Contents:

What is a Wood Engraving?

What you will need to Create your own Wood Engraving

A Short Guide to Wood Engraving Tools

Darkening your Woodblock

Designing a Wood Engraving

Printing a Wood Engraving By Hand


What is a wood engraving?

Wood engraving is a relief printmaking process, like linocutting or potato-printing. It is not a sculptural process.

Wood engravings are created when an artist uses engraving tools (also called ‘burins’) to make incisions on the surface of an endgrain woodblock. When the woodblock is inked with a roller, these recessed incisions do not receive ink. The image is then printed onto paper by hand or in a press. The incisions show up the colour of the paper in the final print (generally white, or off-white). Areas where the flat surface of the block has been left intact will show up the colour of the ink (generally black).

Endgrain woodblocks have been cut perpendicular to the direction of growth; they show rings rather than grain. This results in a dense, even surface which can hold fine detail.


What you will need to create your own wood engraving:
  • A woodblock. Jackson’s stock two sizes of end-grain wood engraving blocks. They are made from Lemonwood, a slow-growing hardwood which is widely used by wood engravers. (It’s not the wood of a lemon tree).
  • Some engraving tools. I will explain which tools below.
  • Some black oil-based relief ink. Do not use water-based relief inks, because they will soak into your woodblock. This will open the grain and may cause the block to warp. Water-mixable oil-based inks such as Caligo Safewash are fine, but if you’re using a water-mixable oil-based ink, you should use a rag dipped in solvent to remove it from the woodblock, not water. Jackson’s also stock Speedball Professional Relief Inks, which are perfect.
  • A solvent, to remove oil-based inks from the woodblock after you’ve finished printing. I use Turpentine (you won’t need much).
  • A rag, to apply the solvent to the woodblock.
  • A spoon, to burnish your print.
  • A roller. You could use a linocut roller, though a PVC roller would be preferable.
  • Some paper to plan your design on. Any fine art paper or cartridge paper will do.
  • Some paper to print on. Nothing too rough or too thin; I used Arches Velin Printmaking Paper. (Thin paper is normally great for printing by hand, but in this case we need a paper which won’t just collapse when folded into a card and placed on a mantlepiece.)

A Short Guide to Wood Engraving Tools: Which Should I Buy First?

Wood engraving tools are properly called ‘burins’. They consist of a metal shank which is mounted on a wooden handle shaped like a mushroom. This stock is designed to fit in the engraver’s palm.

The most commonly-used tools are as follows (images are shown below):

  • Lozenge Gravers have a shaft with a lozenge-shaped cross-section. They have a lozenge-shaped face and an extremely sharp tip. Because lozenge gravers are very sharp, wood engravers use them to create fine lines. The width of the line is dependent on the pressure used, and it is possible to create a flowing line which widens and contracts (though Square Gravers will create lines which vary in width more dramatically.) As well as line work, it is possible to produce short stabs which widen from a sharp point, or to lighten areas by stippling: repeatedly pecking at the wood with the tip of the tool, so that the surface bears a carpet of tiny incisions. Because of the shape of this tool, these incisions will look like scratches, not dots.
  • Square Gravers have a shaft with a square cross-section. They have a diamond-shaped face and a sharp tip. They are particularly useful for cutting thin lines which swell dramatically. Because the width of the line is dependent on the pressure used, it is possible to create a flowing line which widens and contracts, or to make short stabs which widen from a sharp point. Square Gravers are also useful when lightening areas of a block by stippling: repeatedly pecking at the wood with the tip of the tool, so that the surface bears a carpet of tiny incisions. Because of the shape of this tool, these incisions will have slightly sharp edges; engravers wishing to stipple a surface with round dots would be better off using a small Round Scorper.
  • Tint Tools are designed for cutting straight lines of a constant width. The trade engravers of the Nineteenth century referred to a series of parallel lines as a ‘tint’. They used tints to depict colour and form; by varying the width and spacing of the lines that made up their tints, they were able to attain a sophisticated range of mid-tones, between the white of the paper and the black of the ink. These tools are quite difficult to use well and cannot cut curved lines, so they wouldn’t be a good first purchase.
  • Spitstickers have curved sides and a pointed tip. They are useful for drawing long, fluid lines which curve gracefully, and which taper away rather than terminating in a flat or round edge (like lines drawn with a scorper). Used lightly, a spitsticker will score a thin line; the line will swell if the tool is engaged further into the wood.
  • Scorpers are useful for drawing bold lines or big dots, and for clearing away large areas of the block. They come in two varieties: Square and Round. Square Scorpers have a strait-sided shaft and a flat tip. They are used to cut a line of a constant width. Because the tip of the cutting face is completely flat, lines cut with this tool will begin and end abruptly, with a square edge. They will not swell or taper, like lines made with a spitsticker or a graver might; nor will they be rounded at the ends, like cuts made with a Round Scorper (which has a U-shaped tip).

Every engraver seems to have a different selection of three tools which they would recommend purchasing first. My basic toolkit would include a medium Round Scorper, a fine Square Graver and a medium Spitsticker. If you think you will want to work in fine detail, perhaps replace the Medium Spitsticker with a Fine Spitsticker.

Two burins isn’t really enough, but my two would be a medium Round Scorper and a fine Spitsticker.

Three E.C. Lyons Lozenge Gravers. Note the lozenge-shaped shaft and face, and the extremely sharp tip.

Three E.C. Lyons Square Gravers. Note the square cross-section of the shaft and the square face.

Three E.C. Lyons Spitstickers. Note the sharp tip and the slight swell of the face above the tip. Engage the tool slightly deeper in the wood to widen your line.

Three E.C. Lyons Round Scorpers compared. These tools are great for rounded stipples, for drawing broad lines with rounded ends, or for clearing large areas of a woodblock quickly.

Three E.C. Lyons Square Gravers. These tools can be used to draw a broad line with square ends. They are also good for clearing large areas or creating angular stipples.

Three E.C. Lyons Tint Tools. These tools draw a straight line of a constant width. They shouldn’t be forced to cut corners, and you probably need at least three to attain a decent variation of tone in your tints. If you’re a beginner, perhaps save these for a later purchase.


Darkening Your Woodblock

Before you begin engraving, you will need to darken your woodblock so that you can see the cuts as you make them.

I am going to use Indian Ink for this purpose. Ideally, you would avoid putting water-based ink on the surface of a woodblock, but it takes a long time for oil paint or printing ink to dry and Indian Ink is easier to use and clean away. Jackson’s Indian Ink comes in small bottles and works as well as any I have used for this purpose.

Do not use dyes such as Dr Ph Martin’s Watercolour Ink to darken your woodblock. Instead of drying on the surface, they will sink down into the wood, staining it. If this happens then your cuts won’t show up. (You can rub talc into the cuts as you go, but that’s a messy and imperfect solution).

  • Take a mop, hake or flat brush – I used a Raven Mop Brush – and dip it into the Indian Ink. You don’t need it to be heavily loaded with ink, so brush the excess onto the lip of the bottle.
  • Work methodically from the top of the woodblock down towards you. Try to achieve even coverage without flooding the block with ink.
  • Carry on until the surface of the woodblock is an even black. Don’t work too slowly, or the ink will have dried in certain areas before you are finished.

This is a good degree of coverage: a rich black which is not too thick.


Designing and Cutting Wood Engravings

Ideally, when designing a wood engraving, you will want to make sure your design has a mixture of light areas (where the surface of the block has largely been cleared), dark areas (where it’s been left untouched) and mid-tones. Mid-tones can be achieved in a number of ways. Many engravers use thinly-spaced parallel lines of different widths to indicate flat surfaces; the thicker the lines, the lighter the tone. Another option is to cover the area in stippled dots; the more dots, and the larger the dots, the lighter the area.

For my card, I decided to engrave a Christmas cactus in a decorated pot. If you are planning a figurative engraving, try to make sure that you note how and where the light falls on your 3-dimensional object. In order to give the viewer a sense of the 3D nature of your subject (if that’s what you want), you will need to indicate lighter or darker areas, as well as the patterns and textures of the surface. In my case, I had a pattern of white curlicues running round the dark pot; these were engraved with a lozenge graver, and I took care to deepen the line in places where the pattern would catch the light. I also stippled these areas to bring them forward into the light a bit.

It can be very difficult working out how to give a sense of the fall of light on an object as well as the texture or tone of the surface when you only have white and black at your disposal, but that’s the fun of the medium. If you need some inspiration, why not take a look at this elaborate advent-themed concertina by Mary Adshead and Stephen Bone, these more traditional designs by used by John Farleigh, and this piece made for the Redfern Press by Eric Ravilious.

A couple of helpful points to consider:

  • Your drawing will be reversed when you print it, so draw (and write, if you’re including text) in reverse
  • Designs composed of thin black lines with large areas of white are tiresome to engrave and can be difficult to print by hand
  • Woodblock are expensive, so if you have a couple of designs, do think carefully about which one will fit your block better

Once you have finished designing your engraving, you will need to transfer it to your block. You can either do this by simply copying the reversed design straight onto the surface of the block, using any drawing implement which will show up on the blackened surface (a soft pencil normally works, though it can get smudged during the engraving process.) Another option is to place the drawing over the block and trace the design through using transfer paper or carbon paper. If you do decide to draw through your design, use a sharp pencil, but don’t press down too hard or you may damage the surface of your woodblock.

There’s no wrong way to hold a wood engraving tool, but this is a fairly orthodox grip.


Once you have transferred your design, in reverse, onto your block, place it onto a stack of books. This is necessary because to cut a curved line, you will need to rotate the block with your free hand. Without a pile of books (or a leather sandbag, as shown in the photos) you will find it difficult to turn the block freely and will run the risk of burying an extremely sharp tool into your free hand.

Hold the tool as shown above and push it gently over the surface so that it begins to lift a curl of wood off the block. This will feel more natural with practice. You shouldn’t have to push down to get the tool to cut – you should only have to push it forward. However, do be aware that if the tool you are using is a spitsticker, a graver or a round scorper, it will cut a deeper line when engaged further into the surface of the block.

A couple of points to consider when cutting your engraving:

  • Have a good long think before you make any cut; remember you can’t erase the marks
  • You do not have to engrave your design deeply into the surface of the wood; cuts of less than a millimetre deep will show up nicely
  • If you are clearing a large area of white, draw around the edge of the white area then use your largest tool to ‘scoop out’ the middle; this will take less time and is less arduous

Rolling Out Ink and Printing

Once you have finished cutting your design, you will need to roll out your relief ink on a glass or perspex slab.

Use a palette knife or some other implement to transfer a line of ink onto the slab. Only use a small amount of ink at first. Treat it like Marmite; you can always add more later if you need to.

Roll the ink into a square, lifting the roller between each stroke. The ink will be tacky and you should start to hear a hiss. If you can’t hear that then you may have used the wrong ink, or too much of it.

Rolling out ink for a wood engraving.


Roll the ink over your design, taking care not to let the roller slip or to smear it over the surface of the block. (This shouldn’t be too much trouble as the ink will make the roller very tacky.) Three or four passes with a lightly-inked roller should be enough for the first print, one or two between subsequent impressions.

Place your already-folded card firmly and decisively onto the block. The key thing is to place it vertically so as to avoid smudging. My technique is to place a thumb or finger on the inside of the card about where I want the centre of the design to be. I then press down through the paper onto the block.

Work over each area of your design with the spoon, pressing very firmly and passing each area several times. You should try to leave at least a thumb or finger in place at all times, pinning the paper to the raised area of the block, otherwise the movement of the spoon will cause the paper to move, wrecking your print.

Once you think you’re done, tilt your head and look at the paper in an oblique or raking light; you should be able to see the design on the inside of the card, lightly embossed. The effect will be easier to see with thin Japanese papers or dampened paper.

Tips for printing:

  • If you are using a reasonably thick paper, you will get better results if you dampen it before printing. This allows the fibres to soften
  • Always keep at least one finger in place, pinning the paper to the raised area of the block. You’ll have to move your finger from this area in order to burnish it properly
  • Try not to slip off the edge of the block or to burnish areas of white; you’ll crush the surface of the card if you do this

Burnishing the print with a wooden spoon. We used Arches Velin paper, which is a little thicker than is ideal for burnishing, because it’s stiff enough to be folded into a robust greetings card.


Taking a couple of prints from the block to see whether any alterations need to be made.


You might need to make alterations to your design after taking a proof, or to lower the edges of the block, to stop them taking ink from the roller and printing random dots around your image. Best not to do it with the block flat on the table, as here; the author is running the risk of stabbing himself between the thumb and forefinger. Please note, that it is good practice to keep both of your hands behind the sharp end of the tool to prevent injury while working.


Our finished card. With a little more burnishing in the middle, this would have been a perfect print. Certainly good enough to use though!


The post How to Make Your Own Wood Engravings for Christmas or Greetings Cards appeared first on Jackson's Art Blog.

Hand Printing with Schmincke Linol Inks

$
0
0

Linoprint is a very user-friendly medium and Schmincke College Linol and Schmincke printmaking mediums are great for printing on surfaces such as paper and cardboard. The starter set of inks contains five odourless and water-mixable linoprinting colours. These five colours can be used to mix almost every colour of the rainbow. The Schmincke printmaking mediums allow you to modify the characteristics of your ink – they include an extender for creating transparent glazes, a gloss medium and a pearlescent medium.

To demonstrate the use of these inks for great hand-pulled prints without a printing press, the artists at the Schmincke colour company in Germany have carved some stamp carving sheets and rubber erasers in the spirit of the Summer with cheerful seasonal motifs.

The materials they used:

Schmincke College Linol ink set
Rubber sheets and erasers on which they have carved summer motifs
Schmincke Lino Mediums: Lino Pearl for pearl gloss effect, Lino Extender and Lino Gloss
• A roller for colour application
• A glass plate for rolling out the lino ink colours
• Paper for printing – Hahnemühle Nostalgie
• A painting panel was used to help apply even pressure
Spray bottle with water
• Schmincke Lino-Clean


Colour Mixing

The Schmincke College Linol set is perfectly suited for mixing further colours. Here they mixed some red and blue on a glass plate with the roller and got a beautiful violet. For a pearl effect they added some Lino Pearl medium and mixed it into the ink with the roller.


Printing the carved block

They then rolled the violet-pearl shade onto the carved rubber plate. They put the printing paper onto the stamp and pressed it carefully and thoroughly onto the colour. For even pressure that will give an even transfer of the ink they used a painting board on top of the paper. The reveal moment of a hand-pulled print is always exciting! A tip: the best pearl effect can be achieved when using darker colours.


Reactivating the Ink

These inks dry to a wipe-resistant finish within approximately 15 minutes, depending on the thickness of the application – but they are not waterproof. Dried colour on the glass plate can be reactivated with a little water, a spray bottle works great. Then you roll with the roller until the lino colour regains its usual properties. The printing results will be as beautiful as ever.


Multicolour Prints

An already dried print can easily be overprinted with another contrasting colour. If you use the extender medium to create a glaze when overprinting then the first layer will show through, creating a third colour – the first colour, the second colour and the colour created by the overlap.


Demonstrating the characteristics of the Schmincke Lino Mediums

The Schmincke owl logo was printed using neat ink on the left side and ink with a medium on the right side.

Left side: Schmincke College Linol Black – pure
Right side: Schmincke College Linol Black – overprinted with Lino Gloss

Left side: Schmincke College Linol Blue – pure
Right side: Schmincke College Linol Blue – mixed with Lino Extender


Clean Up

With these inks and mediums you can easily clean fresh colour from printing blocks and tools using just water.
If the ink has completely dried on the tools it may help to use Lino-Clean to remove ink from your blocks and rollers.


More Printmaking Blog Articles including how to carve a block or an eraser


Printmaking Supplies at Jackson’s Art

Postage on orders shipped standard to mainland UK addresses is free for orders of £39.

The post Hand Printing with Schmincke Linol Inks appeared first on Jackson's Art Blog.

Choosing a Silk Screen Paper by Legion Paper

$
0
0

We were fascinated to read Leigon’s project in which they interviewed various leading print studios about what kinds of papers they used when screen printing and felt that their findings would be incredibly useful to our readers – the following article has been written by Leigon Papers, a paper manufacturer based in New York, USA.


Andy Warhol - Mick Jagger, 1975, screen print

Choosing a paper for screenprinting should be easy, right? If you can screen print on a t-shirt or a piece of wood, how hard can choosing a paper be? If you’re making a quick, inexpensive poster – choosing a paper can be simple. But when it comes to making a high-quality print – something to be sold, something that will last, something to hang on a wall or in a frame, something to show in a gallery – it’s a little more involved.

There’s always personal preference – what look are you trying to achieve? This will help determine the colour, texture and possibly weight. But beyond that, there are other aspects to consider as paper quality plays a large role in the value and quality of your print. More “commercial”, poster-type papers can react in unexpected ways, causing printing issues, as well as not being able to stand up to sunlight and the test of time.

We’re fortunate to have worked with hundreds of printers around the world going back fifty years. Our papers have been used for screenprints by a wide range of artists & printers – from small poster shops to some of the 20th and 21st century icons including Andy Warhol, Jean-Michel Basquiat, Keith Haring, Erte, Jeff Koons, Alex Katz, Donald Sultan, Claes Oldenburg, Damien Hirst, Shepard Fairey, Roy Lichtenstein and Ed Ruscha. Over the years, we’ve continued to improve our papers to meet the demands of our customers.


Andy Warhol - Marilyn 1967, screenprint

For this article, we asked some accomplished screenprinters to share some information that could help guide your paper decision-making. How do they collaborate with artists to choose the right paper? Which paper fit their needs and why? Although there are similarities among many of the printers, each printer has their own unique methods and favourite substrates.

In general, here are some key things their responses had in common:

  • Ability to hold many layers of colour without warping. 


Lightly or non-sized papers will allow the ink to sink into the paper. A surface-sized paper will keep the ink on the surface and allow layer upon layer to be printed.

  • Dimensional stability

Look for a paper that will not greatly stretch or contract during the printing process (a paper with good dimensional stability). This is crucial for holding registration for printing multiple overlays of colours.

  • Texture

A smoother paper will produce a sharper image capturing more detail, especially for photographic silkscreen. When using a more heavily textured sheet the finish/surface will become a more pronounced part of the final image.

  • Weight

Heavier papers are typically better for stability and to keep the paper from buckling. The general rule of thumb is the larger the sheet size the heavier the weight; it will make handling the paper a lot easier if it has some heft.


Master Printer & Owner of Serio Press, Tony Clough, working on a Cleon Peterson print

TRINA FAUNDEEN, SERIO PRESS

What is your go to paper? Why?

Most of the time, it comes down to pricing and size for the artists. Since we do fine art serigraph printing using water-based inks, we prefer 100% cotton paper, since that is what is used traditionally for fine art printing. Some of the commercial papers on the market, even though they are made for silkscreen printing, react in unexpected ways and can cause problems such as mis-registrations, waviness of the paper, and can sometimes make the ink colours look dull. The cotton fibres are more durable and receive the ink well.

What are your alternatives?

Stonehenge 22×30 is a good paper for smaller prints. Arches and Rives are more expensive but have a very soft texture that is beautiful. We’ve also used Yupo to recreate art that was originally painted on matte mylar.

The Arches Cover black is great as a more traditional choice for black paper. The Somerset is the only rag paper that we can get that comes in that Radiant White so we’ve used that a few times.

What current trends are you noticing?

Most of our clients prefer using the 100% cotton paper, because they want to differentiate their fine art prints from the more casual poster prints done on the commercial papers. However, there are an increasing amount of artists who want something more unique. They want to know that the paper is high quality and archival though, so it’s nice to know that we can trust that the paper from Legion is reliable for fine art prints. For instance, we’ve printed a few editions using the Sirio Ultra Black, because even though it’s cellulose, it’s made using virgin fibers, which makes the paper more durable. People like that they have reliable alternatives for the papers that are not 100% cotton.

What are the most colours you’ve laid down on a sheet?

Tony, the Master Printer, printed a 39 colour print by Carlos Almaraz “Night Theatre” 47 5/8″ x 32 3/8″ when he was printing at Modern Multiples. At Serio Press, the most he has done was by an artist named Tristan Eaton, published by Uncommon Editions, called “Medusa” with 24 colours.

Do the artists choose papers according to their own style? Do they look to the printer to choose the paper?

We guide the process pretty heavily since many of the artists do not know the available options. We can print up to 38×58 right now, so the 44×60 is great for that. When they are looking for something different, I work with them to figure out what is within their budget that will fit with their artwork. We look at the swatch books together if they are local to our studio.


Protest Posters, Glenn Howowitz The Stack Shack 2007, Kate Shepard produced BRT PRINTSHOP

LUTHER DAVIS, BRT PRINTSHOP

What is your go to paper? Why?

Coventry Rag Smooth.  It’s a durable, stiff and smooth paper that is easy to print on because it doesn’t warp when laying down a lot of colours. Also is economically priced.

With lower quality papers one runs the risk of what we call “potato chipping” where the forces of expansion and contraction of multiple coats of ink warp the paper.  Because we are printing with water-based inks and often trying to lay down large fields of color, paper stability is key to a positive end result.

What are your alternatives?

I prefer papers with a smooth finish like Somerset Satin. The smoothness allows me to apply less pressure. After that, Somerset Velvet, with a bit more tooth, but never a paper with a heavy texture.

We use Rising Museum Board when we need to go big. The fact that you can go all the way to 60″x104″ really helps when an edition has a lot of colours; sometimes exact registration of paper from a roll is challenging.

What current trends are you noticing?

Artists like the brightness of the Somerset Radiant White and that it’s a 100% cotton and acid-free paper. Papers that will stand the test of time and that are 100% cotton are important. They also look for something that feels substantial or has a heavier weight. I find artists printing their work by silkscreen want to stand apart from the digital trend. There’s nothing like Somerset Satin for quality.

What are the most colours you’ve laid down on a sheet?

220  colors is our record. It was on Rising Museum Board 4 ply 40”x60”.

Do the artists choose papers according to their own style? What do the artists look for in a paper as opposed to the printer?

We do try to match the aesthetics of the artists – we could most likely match the look of their work or what they’re trying to achieve creatively.

From the grand catalogue of papers, we default to smooth, strong, heavy papers that hold colour.


Ideologie und Utopie des Design, Björn Meyer-Ebrecht

KARL LAROCCA, KAYROCK SCREENPRINTING

What is your go to paper? Why?

Coventry Rag Smooth 290gsm. We like it because of its dimensional stability, heavyweight and affordability. We actually print on the opposite side on Coventry because we like the smoothness. We use Coventry mostly because colours lay on the paper well. It has everything we are looking for in a paper including great pricing.

Most commercial papers aren’t as good for tearing a deckled edge as 100% cotton papers (cotton papers are softer and easier to tear).

What are your alternatives?

If we are using a halftone, we use Stonehenge Paper since the Coventry is better for continuous tones.

What current trends are you noticing?

We’ve noticed a trend in grey papers.

What are the most colours you’ve laid down on a sheet?

About 30 colours is the most we’ve put down. We use waterbased inks so we don’t lay down too many colours.

Do the artists choose papers according to their own style? What do the artists look for in a paper as opposed to the printer?

We usually show the artists the papers that are available. Sometimes they specify if they want a deckled edge or a certain tone; or for fine art prints, we’ll tend to show the artist 100% cotton papers.


"Love Rocks," Cey Adams, 2017. An edition of 100 produced exclusively for God's Love We Deliver, NYC

GARY LICHTENSTEINGARY LICHTENSTEIN EDITIONS

What is your go to paper? Why?

Coventry Rag 290gsm or 320gsm. It’s a beautiful and stable sheet that doesn’t dent easily and it works extremely well with silkscreen.

What are your alternatives?

Lately, I’ve also been using a lot of Stonehenge Aqua Hotpress and Coldpress watercolour paper for Silkscreen.

A few years ago we switched from oil to water-based ink which affects the papers we use. We now tend to use heavier papers to ensure the paper doesn’t buckle.

Because I use so many different papers from Legion, I can sometimes test out a few different papers for one project to find a favourite and more importantly see which papers work best for a particular print.

What current trends are you noticing?

We’ve noticed many artists creating collage, which could result in laying down more layers, so we will use a sturdier sheet.

Artists are also interested in incorporating their own handwork, such as painting over or around the print. This is when Stonehenge Aqua is a good choice since it’s mostly used for watercolour.

What are the most colours you’ve laid down on a sheet?

I’ve put down 120 colours in the 80’s on Lenox Paper, but our average is about 25-30 per screenprint.

Do the artists choose papers according to their own style? Do they look to the printer to choose the paper? What’s the process like?

We choose the paper based on the style of the artists’ work. There are a lot of ideas that come into play when selecting the paper. I first see what papers are readily available in the studio. We usually have a good amount of options on hand. I’ll see how much handling and layers of colour are included to determine the weight of the sheet. It also depends on how large the print will be. Other factors have to be considered though: some paper doesn’t roll, so a finished print will be harder and more expensive to ship.


The post Choosing a Silk Screen Paper by Legion Paper appeared first on Jackson's Art Blog.

Screen Printing with Jackson’s Studio Acrylic Paint

$
0
0

Liz Whiteman Smith is a full-time printmaker based in London, best known for her colourful screenprints of London buildings, Alice in Wonderland characters, patterned boobies, quirky dinosaurs and her elegant little cacti. She shows her original prints at Espacio Gallery, Bankside Gallery, Southbank Printmakers Gallery and the Affordable Art Fair.

For the last four years Liz has been screen printing at Print Club London, a water-based studio, so she works with acrylic paint to which she adds a screenprinting medium. Because she had heard that the new Jackson’s Studio Acrylic Paints were good value for lots of pigment she wanted to see if they would work for her printmaking.

Be sure to watch the three short videos showing Liz’s printmaking process and her very impressive registration technique!


Screen Printing with Jackson’s Studio Acrylic Paint
by Liz Whiteman Smith

Jackson’s has recently brought out a range of 32 studio acrylics in a range of colours. I have been testing some of them for the last few months to see if they would work for my screenprinting: Cobalt blue hue, Sap Green hue, Cadmium red hue, Cadmium yellow hue and Magenta.

Jackson’s Studio Acrylic Paint is a range of smooth, non-chalky and highly pigmented acrylic colours; they are perfect for artists who get through a lot of paint and who demand high pigment levels in their studio essentials. The range includes 29 highly lightfast colours, none of which contain fillers, toxic pigments or heavy metals. Available in bottles only and with a consistency slightly more heavy body than our professional ‘Artist’ acrylic range, these colours dry to a beautiful satin finish and are fully intermixable with any other acrylic brand.’

I use lots of different brands, I started out with Daler-Rowney System 3, but also use Golden and Liquitex acrylic paints to find the exact shade. I use System 3 Acrylic Printing Medium for paper and I print on John Purcell’s Heritage White 315gsm paper. Obviously, there are different reasons for choosing different brands, one is cost. First I looked at the costs of the different brands I use:

Titanium White
Jackson’s Studio Acrylic: 500ml is £10.40 or £2.08 per 100ml
System 3: 500ml is £11.30 or £2.26 per 100ml
Liquitex: 138ml is £9.70 or £7.02 per 100ml
Golden: 150ml is £13.50 or £9 per 100ml

Cadmium Red (some genuine, some hue)
Jackson’s Studio Acrylic: 500ml is £10.40 or £2.08 per 100ml
System 3: 500ml is £ 11.30 or £2.26 per 100ml
Liquitex: 59ml is £9.90 or £16.78 per 100ml
Golden: 150ml is £17.30 or £11.53 per 100ml

This shows that the Jackson’s Studio range is lower in cost than Daler-Rowney’s System 3 range and much less expensive than Liquitex or Golden heavy body. To get a fair comparison I have been comparing Jackson’s Studio range with System 3 acrylic paint, since they are both in the same price bracket and have similar colours with lots of ‘hues’ like the Cadmium Red Hue.

Another factor in choosing acrylic paint is the quality of the paint. For a screen printer that means depth of colour and fluidity. The Jackson’s Studio range was very fluid and easy to work with, I didn’t have any issues with particles clogging the screen which causes blank spots in the finished print as I did with the System 3 paint I used in a previous edition. I also tested the strength of the colour. I printed one screen print – Lithops & friends – with two different Magentas.

Here you can see the two prints side by side, the print on the left was printed with Jackson’s Magenta and on the right with System 3 Magenta. You can see how much richer and more intense the Jackson’s Magenta is compared with the System 3.

Jackson’s Studio Acrylic paint

I found the viscosity good and I also liked the container that the Jackson’s Studio Acrylic came in, it’s very versatile and easier to store as it’s not too wide. However, when you get to the bottom it’s really hard to get the last bit out. I had to cut the bottle in half to use it all.

I also used the Sap green and Magenta in the cactus print I did for Print Club London’s ‘Choose Love’ charity campaign. This needed a lot of ink as it is a large print, the ink needed to have good fluidity and intensity of pigment, both the Magenta and the Sap green worked well.

Jackson’s Studio Acrylic paint

I used the Jackson’s Studio Acrylic Sap green and Magenta for the cactus print I did for Print Club London’s ‘Choose Love’ charity campaign.

Jackson’s Studio Acrylic paint


(After you click play – click the white box in the bottom right corner to enlarge the video – as they are iPhone videos they are a bit small. Then click Esc on the upper left on your keyboard to get back to the blog post.)


Jackson’s Studio Acrylic paint

This is the 3rd edition of my popular Cheshire cat print, this time with a round tail and softer colours. I used Jackson’s Cobalt blue hue for the blue layer.


Jackson’s Studio Acrylic paint

The blue swatch sheet is an example of how I check the different shades of a colour to help me decide which one to use.


(After you click play – click the white box in the bottom right corner to enlarge the video – as they are iPhone videos they are a bit small. Then click Esc on the upper left on your keyboard to get back to the blog post.)


Jackson’s Studio Acrylic paint

I used Jackson’s Cadmium red hue in my latest screen print Tower Bridge and Poppies in one of the 4 layers of red. This print required a delicate blend of different reds to create an intense depth of colour for the poppies. This print will be shown in my latest exhibition Original Print Fair at Espacio gallery, London 30th October to 11th November 2018.


(After you click play – click the white box in the bottom right corner to enlarge the video – as they are iPhone videos they are a bit small. Then click Esc on the upper left on your keyboard to get back to the blog post.)


Jackson’s Studio Acrylic paint

I am also very excited to have had my Clockwork Tasmanian Tiger selected for the prestigious Masters: Screen and stone exhibition at Bankside Gallery, London from 7th to 18th November 2018.


The Artist

Liz Whiteman Smith
Website: lizwhitemansmith.com
Instagram: @lizwhitemansmith
Print Club London

All photos and artwork are copyright of the artist.


Jackson’s Studio Acrylic Paint at Jackson’s Art

JACKSONS STUDIO ACRYLIC PAINT

Jackson’s Studio Acrylic Paint is studio-quality acrylic colour available in 32 colours in 200ml & 500ml bottles, including three metallic colours with Titanium White available in a 1000ml bottle.The great value means it is perfect for artists who use a lot of acrylic paint, including printmakers. Take a look at Jackson’s Studio Acrylic Paint on the jacksonsart.com website.

Postage on orders shipped standard to mainland UK addresses is free for orders of £39.

The post Screen Printing with Jackson’s Studio Acrylic Paint appeared first on Jackson's Art Blog.

Linocut Christmas Card Inspiration

$
0
0

Each year we ask artists to submit a photo that will encourage people to make their own linocut Christmas Cards. It has become an annual tradition at Jackson’s! Since there are so many lovely, skilled printmakers on Twitter we always do the photo competition there. Every year we get some great photos from creative artists.


The Winning Photo

This year the winning image, as shown above, was made by Veronica Butt that will feature in our newsletter about printing your own cards this Christmas. In addition to it being a beautiful card design it is an excellent photo layout for inspiring cardmaking showing the carved lino block, the roller and the multiple printed cards in different colours. Thanks Veronica, we think your great photo will inspire people to try making cards this year! Veronica will receive a £50 Jackson’s gift voucher.
We have also commended photos from four artists who will each receive a tube of Caligo Safewash Relief Ink.

Veronica also submitted another beautiful photo.

Veronica Butt
@Vickywicks538
“It’s all about angels this Christmas”


Runner-up Highly Commended Photos

More creative cards using linocut printmaking!

alison deegan
@a_deegan
“I’m using icy blue ink printed over pops of firey orange tissue paper for my cards this year.”

HandmadebyHaggy
@haggytea
“Here’s my first card design just printed ‘Swans in a Starry Night (over Harty Ferry)'”

Vicky Wyton-Mills
@vicky_wyton
‘moonlit whiskers’

Wooden Spoon Press – Phillip Kingsbury
@WSP_Phillip
“Showing the tools I use to make my Christmas cards. I sometimes use a wooden spoon, and sometimes a beautiful printing press, to print my lino prints.”


Make Your Own Cards

We hope these great examples of printmaking will encourage you to have a go at making your own linocut Christmas Cards this year!

Here are earlier blog posts that might help with the technical aspects:

How to Make Your Own Linocut Christmas Cards.

Create Your Own Festive Cards Using Lino Print


Click on the underlined link to go to the Printmaking Department on the Jackson’s Art Supplies website.
Postage on orders shipped standard to mainland UK addresses is free for orders of £39 or more.

The post Linocut Christmas Card Inspiration appeared first on Jackson's Art Blog.


Mokuhanga: New Arrival Japanese Woodblock Printing Materials

$
0
0

The jacksonsart.com Printmaking department has been having a makeover! In this post our Print expert, Jill Watton, presents some new additions to our Relief Print department and explains the technique of Japanese woodblock printing.


By Jill Watton

You’ll now find 4 main categories within Printmaking at jacksonsart.com – relief, Intaglio, Lithography and Screenprinting. We are especially excited to stock a number of new and exciting Relief print products, sourced from around the world, reflecting the renewed interest in this accessible yet diverse graphic printmaking process.


Contents:

The Appeal Of Japanese Woodblock Printing

Woods Used in Woodcut Printmaking

Tools Used for Woodblock Cutting

Eastern (Japanese-style) Woodblock Printing Process Explained

Japanese Specialist Printmaking Papers


Japanese cutting tools for Mokuhanga

Japanese cutting tools for Mokuhanga

The Appeal of Japanese Woodblock Printing or Mokuhanga

The expressive and organic qualities of woodcut are a big part of the process’ appeal and perhaps a reason why its popularity has been on the rise in recent times. Mokuhanga or traditional Japanese woodblock printing holds particular appeal thanks to the use of non-toxic, water based inks as well as the lack of need of a printing press. The process yields markedly different results to western printing technique; by printing with water-based inks combined with Japanese Nori starch paste the results are subtle and delicate, while Western woodcuts tend to produce bolder results.

Japanese woodblock printing is a craft of discipline and sensibility where the materials and tools, developed from very early Chinese methods, have become arguably some of the best in the world. As always, inspiration is taken from diverse traditions and today we can see many printmakers mixing up techniques and materials from both Western and Eastern practices in order to create the effect they want.


twochiselsmokuhanga

Cutting tools used for Mokuhanga

Woods Used in Woodcut Printmaking

We now stock a wider range of wood for woodcut printing, ready cut to convenient sizes.

Baltic Birch Plywood

Baltic birch plywood can be used with oil or water based ink, and is well suited to traditional Mokuhanga technique. JAS Baltic Birch Plywood is grown in a cold climate which produces a wood with a tight and fine grain, and has layers of birch throughout meaning the core has less voids than other plywood. The surface can be sanded very smooth or brushed with a wire brush to emphasise the grain so that you can incorporate it into your print.

Shina ‘Tilla Japonica’, Magnolia & Katsura Printmaking Wood

Shina ‘Tilla Japonica’ is the most popular wood for Mokuhanga in Japan. It is a sustainable timber grown in the colder climes of Japan and is renowned for its fine, almost indiscernible grain.

Japanese Shina Plywood is soft and easy to carve. It is robust enough to be able to hold detail and sharp edges when put through a printing press.

For solid colour – thicker, solid side grain blocks are available in Magnolia and more detailed-cutting solid side grain blocks are available in Katsura. Both woods are sanded smooth, ready to carve, and are thick enough to take carving on both sides of the block. All of these wood blocks are suitable for using with both oil based and water based relief ink.

Katsura woodblock after Gaugin’s Le Porteur de feï

Katsura woodblock after Gaugin’s Le Porteur de feï


Tools Used for Woodblock Cutting

Pfeil Specialist Woodcut Tools

Having stocked the ever popular Pfeil Lino and Block Cutters for a while, we have now added their range of larger tools designed especially for wood cutting. The innovative long, octagonal handles of the Pfeil Mallet Handle Woodcut Tools help achieve a stable grip when working and can be held with two hands. They can also be used in conjunction with Pfeil’s Hornbeam Mallet, a beautiful object in itself, carved from a single piece of native hornbeam. For bolder, vigorous woodblock cutting these are perfect. The tools are forged from steel manufactured especially for Pfeil, guaranteeing extreme hardness and edge retention.

Woodcut on JAS Baltic birch ply plus Pfeil Mallet handle Moku Hanga

Woodcut on JAS Baltic birch ply plus Pfeil Mallet handle

Traditional Japanese Woodcut Tools

We are very excited to announce that we now stock craftsman-made, traditional woodcut tools from Japan. Japan has a centuries-old reputation for bladesmithing. This is derived from the art of making samurai swords, and from the need for tools capable of precise carving, as seen in the production of Ukiyo-e prints; the ultimate example of this artform being Hokusai’s well known ‘The Great Wave off Kanagawa’. These carving tools were perfected from earlier Chinese innovations and designs.

The quintessential Japanese carving knife is the Hangi To. This tool is held upright in the fist with the thumb on the top, it is used for outlining your design with flexibility and accuracy. You can add control by placing the opposite index finger against the blade as you cut. We carry Hangi-To in a variety of sizes and cater for both the left and right hand. You will find a brief outline of how the various styles of tools are used on the website plus information on the uniquely Japanese Kento registration system. We have also introduced a very economically priced set of five Japanese woodcut tools which are ideal for the beginner or for light use. Familiar to all Japanese students, these entry level cutters offer good quality steel blades that can be re-sharpened using the small waterstone included the set. [It is worth remembering these tools can also be used for lino cutting and vinyl so could be a good investment for several mediums.]

Vinyl cutting and Japanese Traditional tools mokuhanga

Vinyl cutting and Japanese Traditional tools


mokhangaprinting setup

Eastern (Japanese-style) Woodblock Printing Setup

Eastern (Japanese-style) Woodblock Printing Process Explained

The greatest difference in approach between Eastern and Western woodblock printing is the method of inking the block. When making Japanese-style woodblock prints, inking is done with a brush rather than a roller. The uneven surface of the block, as well as the mixing of nori paste and pigment on the block, makes a brush the logical tool. The specialist inking brushes, hanga bake, are held upright, brushing over the print areas with circular movements. This method of applying ink allows for greater control and manipulation of colour as you can adjust the amount of pigment on the block, as well as create gradations of colour through blending.

Japanese nori (glue) paste is used in the printing process to bind and disperse the pigment colour and add to its brilliance. As mentioned earlier, colour can be in the form of a liquid pigment such as Akua Liquid Pigment, artists’ watercolour, gouache, or Sumi ink.

Taking a print from the inked block utilises the baren, a small, flat, disc-shaped tool that is rubbed over the back of the paper in a zigzag pattern while applying pressure with the heel of your hand. Traditional hon barens are finely crafted tools that are deceptively sophisticated.

What is a baren made of?

Fine rope coils are fixed to a rigid disc of layered washi then covered with an outer layer of bamboo, made by hand. Producing Japanese Printmaking barens is an art form in itself, and it is possible to invest a great deal of money and/or expertise into making the very best. We have introduced some affordable yet effective versions to our stock; you will find them in the Japanese woodcut / sundries section of the relief printing department, alongside everything you need to start printing.


Woodblock in progress

Woodblock in progress

Japanese Specialist Printmaking Papers

We’ve also introduced some specialist papers from Japan. Japanese papers, known as washi, have great character and resilience and are ideally suited to withstand the stresses of hand printing where strong pressure is exerted on the dampened paper. The inherent strength and dimensional stability of these papers helps prevent them distorting, so that accurate registration can be maintained.

Traditional Japanese woodblock printing has, for centuries, utilised washi made from the inner bark of the paper mulberry tree: kozo. Kozo fibres are extremely long and will create very strong and absorbent paper. Gampi has long silky fibres that can create a thin, translucent and smooth tissue-like paper.

Awagami Factory, a sixth generation family run paper mill make washi from these traditional fibres as well as non-tree fibres such as bamboo, cotton and hemp. Awagami papers are acid free and our selection comes in a range of prices and sizes, as well as a special selection pack for you to try.


You can view our full Japanese Woodblock Printmaking range here.

The post Mokuhanga: New Arrival Japanese Woodblock Printing Materials appeared first on Jackson's Art Blog.

5 Recommended Pfeil Tools for linocut by Artist Colin Blanchard

$
0
0

Colin Blanchard is an experienced linocut print artist and blogger of his process. In this specially commissioned article Colin explains why he believes you only need 5 Pfeil tools in your box. Invaluable advice for anyone looking to get kitted out for linocut printmaking.


By Colin Blanchard


With experience, a small range of tools will make a wide variety of marks, simply by varying the angle and depth of cut


Through an understandable reservation about spending too much on something new, or perhaps attending a group workshop, most people begin lino cutting with cheap, often poor quality tools. And one of the most common things I hear is “I love lino printing and I’d like some better tools, but they are so expensive! – and I don’t know which ones to get”

But to put it in perspective; in terms of value for money, even the very best gouges cost less than a cheap meal and a drink, but they will, with care, outlive you! Sell a few of your (much improved) prints and you’ll quickly pay for a small set of four or five beautiful tools that will soon begin to feel like old friends and will repay your investment over and over again. Not to mention the pleasure of using a tool that actually works for you!


Different gouges will ‘draw’ in different ways. ‘Goldfinch’ by Colin Blanchard


So what do we lino carvers need from our tools?

In most situations, all we need to do is leave a nice raised flat surface that will take the ink and print it cleanly on to our paper (or fabric). This means that, especially in the detail of most images and if correctly inked, the shallowest of cuts is all you need. Fine ‘positive’ printing lines and other ‘isolated’  marks will need to be carved so they do not crumble and break off. Some areas will need to be removed altogether and slightly larger gouges will speed up that work. And with experience, a small range of tools will make a wide variety of marks, simply by varying the angle and depth of cut. With practice – lino gouges will make images that have qualities unobtainable with any other media.


With practice – lino gouges will make images with qualities unobtainable with other media. ‘One plus One’ by Colin Blanchard


Most important of all, your tools must be sharp and kept sharp. A quality gouge will not only take a good edge, but with practice, can be quickly ‘stropped’ to retain it. Such tools can also be sent away and professionally re sharpened if required.

So what are the very best gouges? And which ones should you give up your meal and drink for? Well, of course, like everything in printmaking, everyone quite rightly has their own preferences. Also, in time, you will accumulate all sorts of extra little tools and personal methods of working. I have all sorts of gouges in my collection, but the only ones I use when working seriously on a nice newly prepped bit of real lino block are my favourite set of five Pfeil gouges (plus the occasional use of a standard small craft knife or scalpel).


Background ‘chatter’ gouge marks can be used to good effect. ‘Leap Frog’ by Colin Blanchard


Pfeil (German for Arrow) are a Swiss company who make a huge range of woodcarving tools. Each tool is made from easily re sharpened chrome vanadium steel, and the mushroom shaped palm-handles (for me – by far the most comfortable and manoeuvrable type) are made of hardwood. From their vast range of tools, their smaller ones have proved ideal for carving lino; but their number coding system requires a training in code breaking! Thankfully Jackson’s have selected those most popular with printmakers. However, when considering which ones to buy, do look very carefully at the various boxed set selections, which sometimes contain tools the printmaker may not actually need. I recommend buying individual tools and building your own set.


The mushroom shaped palm-handles are for me, the most comfortable and manoeuvrable type.


Colin’s Five Pfeils

What follows is my own preferred set of Pfeil gouges. I stress again, we all have our own way of working – but these certainly work for me!


The fine V first cuts an accurate visible line using one side or the other of the V. It also cuts a sloping ‘shoulder’ to the lino which helps prevent crumbling.

1. Small V – 12/1

First is the workhorse; the small V – coded 12/1. I use this one more than all the others put together. In fact I have two. One is sharpened at the original angle as supplied. The other I have ground and sharpened to a slightly steeper angle, which enables me to use a personal technique on textures for fur and feather etc.

The pictures illustrating this post show the use of ordinary grey ‘artists’ lino rather than my preferred’ slightly firmer’ ‘Marmoleum’ flooring lino. I thought it better to show what most people would be dealing with. I personally cannot stand any of the plastic ‘alternative’ lino products and many of the points I make here about the subtleties of different tools become irrelevant when using plastics – which do not allow the accurate ‘break and flick’ technique of traditional (bio-degradable!) lino.

The 12/1 is not only used to make a wide variety of fine marks, textures and detail, it is used to outline basic forms and areas that will print clear of the background; from large solid flat shapes, to those requiring accuracy – like text. The fine V first cuts an accurate visible line; using one side or the other of the V to accurately follow the guideline. It also cuts a sloping ‘shoulder’ to the lino; which helps prevent crumbling of things like thin fine ‘positive’ lines.

People are often tempted by the slightly bigger V tools available. Don’t be. You are not carving a wood sculpture, so the depth of cut is irrelevant once the surface is removed, and the angle of the V on the bigger ones is pretty much the same as the 12/1  – so there is no real advantage. I have a couple that sit unused in my tool box.


The 11/3 medium U removes plenty of lino to speed the work, but is small enough to follow up the accurate outlining of the 12/1


2. Medium U – 11/3

The next favourite tool I use tends to be the 11/3; a medium U gouge. It removes plenty of lino to speed the work, but is small enough to follow up the accurate outlining of the 12/1: again using one edge or the other of the U. Do beware though. With a sharp 11/3 it is all too easy to get carried away and find you have whizzed through an area that was meant to remain!


The 9/5 – for really shifting larger areas of non-printing lino. As with any U gouge it can also be used to create textural marks by just skimming the surface.

3.Large U – 9/5

My next invaluable tool is probably the 9/5 – a large U gouge used for really shifting larger areas of non-printing lino once the accurate work has been done. As with any U gouge it can also be used to create textural marks by just skimming the surface of the lino and subsequently controlling the printing of those marks through a balance of inking, packing and pressure.

So now, if we include the odd job that requires a flat craft knife or scalpel, that set of just three Pfeil tools: the 12/1, the 11/3 and the 9/5, would be sufficient for most images. However, I would recommend giving up a couple more meals and drinks and getting just two more:


The 11/1 small U is invaluable for those small ‘interior’ curves, like when carving text. ‘Names of the Hare’ by Colin Blanchard


4. Small U – 11/1

The 11/1 – a small U I find invaluable for those small ‘interior’ curves; where I spin the block slightly at the same time as pushing the tool itself. It gives a nice clean detail curve without the risk of a broken, crumbled edge you can get when using a V tool on a tight bend. Again, it also opens up a few more textural options of circular dots and various ‘flick’ marks.


The 5/8 flat U is a useful tool for cleaning up all those non printing areas that run the risk of catching ink and printing background ‘chatter’.

5. ‘Flat’ U -5/8

Finally a 5/8 flat U is a useful tool for cleaning up all those non printing areas that run the risk of catching ink and printing the irritating background ‘chatter’. These gouge marks can be used to good effect in certain prints, but generally I like to both cleanly flatten the area with the 5/8 and also use a paper mask.

So there we are. A simple set of five Pfeil gouges; currently available for just over £90. Not all that much when with care they will last for many years. And once you begin to realise that your gouges are as much a drawing implement as a pen or pencil; and you find yourself reaching instinctively for the right one for which ever part of your image you are working , you will know that any limitations are yours – not theirs!


Gouges are as much a drawing implement as a pen or pencil – and in time you find yourself reaching instinctively for the right one (linocut by Colin Blanchard)


See more of Colin Blanchard’s prints and how he makes them at www.colinblanchard.com


The post 5 Recommended Pfeil Tools for linocut by Artist Colin Blanchard appeared first on Jackson's Art Blog.

Casting A Spell: Image Making with Screenprint, Linocut and Gold Leaf by Colin Blanchard

$
0
0

In this post artist Colin Blanchard charts his journey through making a print of a hare incorporating Screenprint, Linocut and Gold Leaf.


By Colin Blanchard

A while ago I wrote a post about lino tool selection; and in that I demonstrated carving a little unmounted ‘grey’ lino block. I set it up on my little portable press (actually an XCut Xpress ‘craft’ press) and was pleased enough with the proof to give some thought to developing the image. So as I often do, I planned to combine screen print with the linocut (plus something else new that I wanted to try) and I ended up making a small but quite successful edition. This is how I did it.

Like most printmakers, I’m always keen to experiment with different technical challenges. Just recently I have been working on the technique of screen printing with a mix of acrylic gold size and screen ink base and then applying real 23ct gold leaf (transfer as opposed to loose) to the printed image. For this print I wanted to see if I could screen print in transparent colour on top of the applied gilding!


A proof was taken of the finished demo block.

1a. A proof was taken of the finished demo block.


1. First the lino block was set up on the little press with a registration system using ‘Ternes Burton’ metal pins and plastic tabs. This system not only prevents print slippage in any sort of roller press, but with care, also allows me to use the same tabs for both lino and screen printing. I took a couple of proofs, in careful register, from the block. At the same time I prepared fifteen or so sheets of my preferred White Satin Somerset 300gsm paper with their TB tabs.


Fifteen or so sheets of paper were prepared and set up with registration system.

1b. Fifteen or so sheets of paper were prepared and set up with registration system.


2. Using one of the dried proofs, a simple screen stencil was prepared on a 90t mesh screen. This slightly coarser mesh (than my usual 120/140t) puts down sufficient gold size/ink base in one printing pass. The TB pins are taped to the screen bed well out of the way of the passing pressure of the squeegee when printing, but I usually apply a little protective gaffer tape on the underside of the mesh where the pins touch – just to be extra sure the screen is not damaged. The same tabs on the edition sheets work well to give me accurate registration between the two printing methods.


A simple stencil to lay down the size and ink base mix

2. A simple stencil to lay down the size and ink base mix


3. All fifteen sheets were then printed with their size mix and the gold leaf applied. I have found it best, if possible, to apply gold leaf first of all to a print; as any slight tackiness of ink already applied (screen or lino) even if dry, can attract annoying bits of the gold.

Then came the riskiest part of this project. Could I print a transparent grey on top of the gold to create a moon surface texture effect, without losing the brightness and impact of the gold leaf? Or had I wasted a couple of day’s work? …..not to mention all that gold!


Each sheet was gilded before any more ink was applied .

3. Each sheet was gilded before any more ink was applied .


First attempt was a photo stencil of a full moon

4a. First attempt was a photo stencil of a full moon


4. I first made a photo-stencil from a free image of the moon. This was clearly going to put down too much ink and also have perhaps a too ‘photographic’ quality. So after two more attempts with photoshopped film positives, I simply worked on one of the photo stencils by hand to put the extra marks where I wanted them.


...Which was modified with hand drawn textures

4b…Which was modified with hand drawn textures


5. Then came a straightforward screen stencil for the blue background. I use this way of making screen print images all the time. Lascaux screen filler, although laborious to clean off once applied, can be painted, sponged, splattered etc in a variety of ways (usually to an accurate pencil tracing on the mesh) to block the mesh to make quick and direct stencils. By this time too, I was formulating some words that might go with the image, so stars were added. I was also beginning to think about Victorian ‘medieval’ decorative arts qualities that might suit here, so I made the blue brighter than I originally planned.


The background blue was another very simple hand painted stencil

5. The background blue was another very simple hand painted stencil


After checking the registration system and a test print...

6a. After checking the registration system and a test print…


6. After checking the registration once more, I applied the carefully chosen transparent grey to just two of the gilded sheets. I had to wait 24 hours for them to dry completely (this screen ink dries very quickly indeed on a more absorbent surface) but the effect was successful, so all the rest were printed.


All the gilded sheets were printed.

6b. All the gilded sheets were printed.


7. With the moon and stars complete it was time to return to the lino block and see if I could make the hare image strong enough to suit the background. ‘Reduction’ printmaking (printing all tonal stages from one block or stencil; physically reducing the print area after each colour – and no going back!) is always a leap of faith. But this was a fairly straightforward reduction from pale brown, through a slightly gingery brown, to almost black in four stages. The registration for such an image has to be spot on of course, or fine textural details, misprinted, give an awful ‘out of focus’ effect.


I was able to return to the lino block and begin a four stage reduction

7. I was able to return to the lino block and begin a four stage reduction


8. I use Caligo Safewash ink almost exclusively; and I find that if used thinly and with plenty of extender (50 -90% depending on the image) the colours are still strong enough, but drying times are much reduced. Often between stages of a reduction I will also use a light dusting and very careful polishing off with ordinary cornflour on the previous layer(s) – done by using a padded dabber made of soft old cotton t shirt fabric; I dip it into a small dish of cornflour and dab gently on the tacky areas; then with another soft piece of the same soft cotton VERY lightly brush off any excess and lightly polish until the full colour returns. This does not dry the ink totally but enables stacking of the sheets and application of the next layer within a few hours.

But while waiting for each lino stage to dry, I got on with finalising and composing the type script. Options to include my words with my images are many and I have tried lots of ways. One possibility here was to surround the square, but as you can tell by the space under the image I’d already left, I decided to stick with my original planned position for the verse. Also by now, I was keen on hinting at a bit of a Victorian ‘Gothic’, look; so designed the text (using Photoshop) appropriately. Laying the photo transparency needed to make a screen stencil over the image gave me a good idea of whether it would work or not.


At the same time I began to think about how the words would look.

8. At the same time I began to think about how the words would look.


 A final layer or two of transparent colour was added with another hand painted stencil

9a. A final layer or two of transparent colour was added with another hand painted stencil


9. The hare herself was OK, but as the original demo block was never planned as a reduction, clearly she needed some extra colour and tone. This is very simple and quick with two or three more hand painted screen stencils and some transparent colour. The final touch of the magic amber of her eye was added with watercolour.


And the main image was complete - with the loss of two of the sheets I began with.

9b. And the main image was complete – with the loss of two of the sheets I began with.


10. So after a week or so’s work, I ended up with thirteen perfect prints ready to receive the verse. Rather than register two separate stencils to give me ‘medieval’ red capitals, I printed all the text first in red, then blocked out the ones to remain red and (trusting my registration!) overprinted in a semi-transparent black to give me dark sepia text for the rest.


The lettering photo stencil was colour separated on the screen.

10. The lettering photo stencil was colour separated on the screen.


11. And the print is finished; signed and stamped.

And the print was finished!

11. And the print was finished!


Footnote:
All but two of the final edition of twelve sold within 48 hours.
Wish I could get it right like that more often!


To find out which 5 Pfeil tools Colin Blanchard considers essential to his linocut printmaking click here

https://www.colinblanchard.com/

The post Casting A Spell: Image Making with Screenprint, Linocut and Gold Leaf by Colin Blanchard appeared first on Jackson's Art Blog.

3 Artists Adapt To Help Flatten the Curve

$
0
0

Artists are continuing to work in spite of not being able to go to their studios because of the pandemic lockdown. They have adapted their practices and set up temporary home studios. With the challenges of less space, domestic furniture, other family members, lack of equipment and trying not to get paint on the curtains, artists are adapting their working methods and the work they are making during this uncertain period. To get an idea of how everyone is managing I asked two artists a few questions about how they chose what materials and equipment to take from their studios, how they have set it all up at home and if their work has changed. I also answered the same questions myself.


Making Art During Lockdown

Sally Hirst

Sally Hirst is a professional artist who teaches painting and printmaking workshops in the UK and Spain. She wrote an article for us earlier this year: Sally Hirst Compares Cold Wax Mediums. Sally has set up a temporary studio in her small flat to continue her painting and printmaking practice. Sally is also learning how to do live streaming so she can make some workshops to share online.

What percentage of your studio did you bring to your home?

2%. My studio is 36sq meters and now I’m reduced to just 3sq meters.

Sally Hirst’s studio

How did you decide what you would be doing, so you could decide what to take?

I thought about what I could feasibly bring, what media and scale I could work on in such a small space. I had a few small paintings I wanted to finish so they came and the materials I needed to do that, but I also saw it as an opportunity to do things I haven’t done for a while, small scale mark-making, simple bookbinding. I also decided I wanted to deliver some online workshops so I need to think about – What could I make for videos, What will people want to learn. At least my situation puts me in the same position as many of my students, so if they can do it so can I.

The first of the two trolley-loads Sally took from her studio.

Was it difficult to fit it in your home?

I live in a small two-bedroom flat with no garden. In our spare bedroom which is 2.5m x 4m we have two single beds. As we are not expecting visitors in the foreseeable future I stacked one bed on top of another. In this bed-size space I have put a long pasting table (60 x 180) and a chair. I can store things underneath the table and I’ve put a cover over and cardboard on the stacked bed so I can use it as an additional surface.

Sally’s temporary studio

What tips do you have for setting up a temporary/emergency home studio?

Imagine you are going on a retreat, what would you take, what could you get in a suitcase or a small car? Take it as an opportunity to play, to explore, to work small, and to stop thinking ‘finished paintings’. On a practical level consider those around you. This is also my husband’s home. I will try to keep my wet work and dirty cloths away from communal areas, keep paint off the carpets, and brushes out of the bathroom sink!

What do you wish you had brought from the studio, but didn’t think of?

Ah, it’s still too early to have found that out! There’s a large tin of chocolate biscuits that would have come in handy!

How have you managed without the thing you forgot, did you order it delivered or try a new way of doing things?

I realise that working on paper would take up less space than my usual panels, so I ordered some from Jacksons. I’m also planning some online workshops, in my studio there’s everything to hand, so I have thought carefully about what people can get easily get hold of and purchased a few ‘sets’ of things to develop projects around.

Has working at home changed what you make?

I’m hoping it will encourage me to explore ideas around scale, make more work on paper, be less precious, live for the moment. My galleries have closed, no-one is buying so this is a self-imposed residency!

Where are you putting wet artworks to dry?

I already had some shallow picture shelves up on the wall (Ikea) so I have cleared them. But I will be spilling out into the hallway and pinning work up in the shower with masking tape.

The picture ledges she will use for wet work are above her table.

Anything else you’d like to add?

The situation we find ourselves in means we have to adapt and change. I’m used to having space, used to teaching live, that is all upside down now and I have to adapt. I’m currently learning how to live stream sessions on Facebook. We will come through this with new work, new skills and new approaches to our work and our lives.

Sally will be posting the live sessions on her Facebook page Sally Hirst Artist and Tutor.

http://www.sallyhirst.co.uk


Nick Morley

Nick Morley is an artist printmaker and tutor who runs Hello Print Studio in Margate. He is also the author of Linocut for Artists and Designers. Responding to the stay-at-home directive, Nick has temporarily moved his studio to his home. Nick is also putting videos on YouTube to share some workshops online.

What percentage of your studio did you bring to your home?

About 2%. I have left behind all my big presses, books, big ink rollers, etc.

How did you decide what you would be doing, so you could decide what to take?

I figured I’d make some new work and reprint some old blocks. I did two trips on my bike so I was limited to what would fit in my panniers. I took as much lino and paper as I could carry and my tools of course, plus a little X-cut press which I use when I do workshops off-site.

Was it difficult to fit it in your home?

I am very fortunate that we have a loft with a skylight so it’s actually quite spacious. I have had to move some boxes around to make room though. With a four year old in the house, it’s good to have a separate space I can use.

home studio

What tips do you have for setting up a temporary/emergency home studio?

I guess you have to adapt what you are making. I’m lucky because to make linocuts you don’t need very much space or equipment.

What do you wish you had brought from the studio, but didn’t think of?

Hopefully, I have everything I need! Let’s see how long the stack of paper lasts…

Has working at home changed what you make?

I can’t make any big prints. And I can’t run workshops, so I’ve started making YouTube tutorials. I’ve only managed two so far as I’m mainly working in the evenings and learning how to edit films on my phone took a couple of days. I’ve done one about drawing a design on the block and one about carving lino. I’m planning to post lots more in the coming weeks.

Here is the link to my YouTube channel: https://www.youtube.com/user/Linocutboy

Where are you putting wet artworks to dry?

I’m going to string up some pegs in the rafters.

Read our interview with Nick Morley from a few years ago.

www.linocutboy.com
www.helloprintstudio.com


Julie Caves

Two weeks ago I began self-isolating and to continue my painting practice I set up a temporary studio in my lounge. I have been painting every day that I haven’t been working remotely on the Jackson’s Blog.

What percentage of your studio did you bring to your home?

I’ll go with 2%, also. My studio isn’t huge but I have over 20 years of paintings (finished, abandoned, in progress) stored in there so it is pretty crowded. I brought 3 Ikea bags of paints, brushes, mediums and gesso. A box of small painting surfaces – mountboard offcuts I had primed, unfinished small paintings, oil painting paper and little canvases. A box of A3 gatorboards to use as shelves to lay flat in spare places with paintings on them to dry. And my Half Box French Easel.

How did you decide what you would be doing, so you could decide what to take?

Like Sally, I thought about what was going to be possible in the space I was going to have. My lounge is really small, so I thought I would make small paintings. Because they would be small I didn’t need any large brushes except one for priming. The bare minimum of colours and mediums, solvent, brush soap, palette knives, palette, apron, and gloves.

Julie Caves

Was it difficult to fit it in your home?

Thinking about making a mess is something I don’t do at the studio but I am conscious of it here. I planned on draping something over the chair but got oil paint on it before I even started. I then slid the seat cushion into a bin bag and that has worked really well. I had planned on folding the french box easel each night but I only need to slide it over the box I’m using as a side table for my palette – the legs slip in the gap and it all fits well.

The legs of the half box french easel slide into the gap next to the chair so it puts away neatly. The seat cushion is inside the bin bag. Materials are under the kitchen table.

What tips do you have for setting up a temporary/emergency home studio?

If you are an oil painter think about ventilation. I had planned for this, so have a fan going in the open window. Plan to adapt, try something new. See how much you can do with how little. Plan to focus on one thing for a while and really get to know it – a colour of paint, a subject, an idea like contrast or using a variety of greys.

What do you wish you had brought from the studio, but didn’t think of?

Some paintings for #artistssupportpledge on Instagram, I moved my studio to my flat right when the initiative was started. So I’ve been putting some of the new work on.

How have you managed without the thing you forgot, did you order it delivered or try a new way of doing things?

I had an order delivered of oil ground and oil medium. And somehow I had managed to not bring a Cadmium Red, so I got that. If I run out of materials, I have a few inks, watercolours and sketchbooks that I already had at home for sketching in the evening, and I can switch to using those.

Has working at home changed what you make?

I already work quite small sometimes. But I am exclusively working small now and on thin boards. I’m sad to say I have better natural light here at home so my paintings seem sunnier but that could also be that it is Spring!

Where are you putting wet artworks to dry?

I have laid A3 gatorboards across every flat surface in the living room and have small paintings all around the place drying.

Anything else you’d like to add?

Being limited means you can explore an area more thoroughly because it is smaller. So I think I may benefit from the concentration and focus, not being distracted by too many options. There are also lots of positives around personal comfort and convenience: it’s warm, there is no commute, there is fresh air and I don’t have to pack a lunch. Being in lockdown also means I am here for deliveries!

juliecaves.com

My small set up in the lounge facing the kitchen.

The post 3 Artists Adapt To Help Flatten the Curve appeared first on Jackson's Art Blog.

Sharpening Linocut Tools by Colin Blanchard

$
0
0

In this post Printmaker Colin Blanchard talks us through how to sharpen linocut tools using a number of sharpening stones including the Flexcut Slipstrop and a Japanese sharpening stone.


Text by Colin Blanchard

Stay at Home – Stay Sharp!

A while ago I wrote a piece for this blog about my favourite Pfeil gouges – and in that I said:

Most important of all, your tools must be sharp and kept sharp. A quality gouge will not only take a good edge, but with practice, can be quickly ‘stropped’ to retain it.

It is possible to send your tools away and have them professionally re-sharpened, but really it is best to learn to keep them in full working order at all times. Little and often is the key and a quick check and strop before each carving session should be part of your creative preparation ritual.

It may be, with heavy regular use and lots of sharpening, that they will eventually need to be re-ground. Again though, with some thought, practise and the right kit, it is possible to also do this yourself. Here though, we’ll deal with the day to day sharpening and maintenance of your all important tools. You simply cannot control the quality of a relief cut image with blunt blades!

The other thing to remember is that a blunt gouge is actually more dangerous than a sharp one. Having to put extra pressure into your cuts is what leads to slips and the hand steadying the block against that pressure is more likely to be in the way!

So why not use some of the extra time many of us have at the moment and practise sharpening and maintaining your gouges? As always – I must stress this is my approach to the job. Others will do things differently – but will end up with the same result!

So what is a correctly sharpened gouge?

First, very obviously – the edge doing the cutting should have a ‘zero radius’ – a perfect sharp angle where the two sides of the tool’s cutting edge meet. Consistency of angles are what the whole process of efficient sharpening is about. (Fig 1)

Fig. 1


The second objective is to have this sharp cutting edge meeting the print surface in an effective and comfortable way. If the sharpened edge has too steep an angle, the gouge will have to be held at an awkward height in the hand to work; and will either dig in too readily or skid on the surface. Too shallow an angle, and the edge will be difficult to get sharp in the first place and will also tend to slip out of the cut.

If you look at a brand new professional gouge – such as the Pfeils we have been talking about, you will see that there are actually two angles at the cutting edge: The ‘grinding’ angle – which is quite shallow – around 15 – 20°. Then if you look closer you will see that the actual cutting edge is a little steeper – 25 – 30°, on the outside edge; and – importantly – it meets a flat, smooth surface on the inside of the gouge. The meeting of the inside and outside edges is regular and even – and of course sharp, with absolutely no visible ‘radius’ catching the light on the cutting edge whatsoever.

It is that 25 – 30° edge that we want to keep sharp and even. With regular maintenance – consisting of frequent ‘stropping’ and occasional light re-sharpening with a very fine stone or similar (and before the tool actually becomes too blunt to use) there should be no need to worry for a long time about major re sharpening or even re-grinding.

Over the years I have acquired all sorts of bits of sharpening equipment, but there are really just a few key items that you will need to keep that razor sharp edge on your quality gouges:

1. A fine grit sharpening stone with a decent flat surface

First a brief word about sharpening stones. The abrasive grade of stone etc is measured in ‘grit’ numbers: the higher the grit number – the finer the surface. The very finest stones are naturally mined and often called ‘Arkansas’ stone. There are many man made sharpening stones where the grit size is controlled. Some stones work best with just a little oil; others – usually the synthetic ones – are called ‘water stones’ and are designed to be soaked in water before use. I tend to use a light oil on all my stones.

Do not get confused by the term ‘whet’ stone though. To whet (note the ‘h’) simply means to sharpen; and although water or oil as a lubricant is always a good idea, it doesn’t necessarily mean the stone has to be soaking wet.

For small tools you do not generally need a big expanse of flat surface. But with the smaller softer stones, after repeated use in the same spot, it is possible to wear a depression in the stone. This is not too much of a problem for U gouges – but of course, not so good for the flat edges of V gouges.

2. One or two ‘slip’ stones with either or both V and U edge profiles

As stated earlier, the inside face of a gouge is kept flat and not sharpened at an angle. And the sharpening of the other, angled, face of the cutting edge will raise what is known as a burr The slip stone is used to carefully remove the burr along the flat of the inside – thus giving us our ‘zero radius’ edge. (Fig 2)

Fig. 2


It is important that the profile of the slip – particularly for the different sizes of U gouges – fits the curve or angle of the gouge. For the very small U gouges, I tend to use some very fine grade ‘emery cloth’, rolled to fit.

It is of course possible to combine your flat surface and slip stone in one. Jackson’s supply a cleverly designed Japanese synthetic 4000 grit water stone with good flat (if quite soft) surface, that also has V and U edges graduated to fit different gouge profiles. I have modified mine further by shaping the stone to even smaller V and U profiles at either end.

I do also particularly like my little Arkansas stones; one of which has a small V edge profile, but is just big enough to use on the flat side too. I also have a very hard vintage stone I inherited from a wood engraver.

3. ’Stropping’ equipment

It is remarkable how beneficial (and in the long run – time saving) it is to have your strop to hand and to give your gouges an occasional little ‘whizz up’ as you work.

The idea of stropping is simply to maintain and refine your already efficiently sharpened edge; by polishing off the microscopic scratches and unevenness left by even the finest of stones and keeping our zero profile cutting edge super sharp. It also slightly ‘rounds off’ the difference between the grinding and sharpening angles – giving a smooth profile to the underside of the gouge.

The equipment required consists of a piece of unpolished leather and some soft wood shaped into suitable V and U profiles; plus polishing compound or cream. You can make your own by fixing a piece of leather to a board and cutting matching grooves or profiles in a piece of close grained softish wood.

However, one of the most useful and common items for this job is the Flexcut Slip Strop; which has all you need in one neat and handy pack.

So – let’s get on and do some sharpening!

www.colinblanchard.com/

The post Sharpening Linocut Tools by Colin Blanchard appeared first on Jackson's Art Blog.

Setting Up the Fome Etching Press

$
0
0

In this first article in our series about the Fome Etching Press, our printmaking expert, Jill Watton, shows us how to set up the popular Fome etching press, to get the most from this great little printing press.

Setting up the Fome Etching Press

by Jill Watton

This affordable, small etching press is incredibly popular because it punches well above its weight when it comes to producing high-quality prints. The press is available in three sizes: the 25cm size has been a best-seller for many years, we added the smaller 18cm press last year and we have a new larger 30cm press coming soon. Manufactured by Fome, just north of Venice, these small-scale, well-engineered presses are marketed for a school setting and beginners and are very popular with customers across the world. After reading our customer reviews of the press, we thought there might be a few things useful to know before you begin printing. In a series of three articles, we will take a look at the setting up the press, getting the best out of printing with it for intaglio, and using it for relief printing. In this first post, we will discuss the assembly, set up and securing of the press ready for printing.

Jackson's Fome printing press

Fome School Etching Press – 25cm


Your new Fome etching press

Fome have created their lightweight and very portable press in three sizes: 30cm, 25cm, and 18cm. The dimensions refer to the width of the bed, meaning you can print up to A3 on the larger press and A5 on the smaller press. Keeping the scale small means the solid steel rollers and 3mm steel bed don’t add too much to the overall weight of the press. With external dimensions of 27x42x17cm for the middle-sized 25cm press, this press won’t take up too much space in your studio but you should think about positioning the press with plenty of room around for printing. Of course, it will be very easy to move into position from storage as the weights are 8.5kg for the 25cm press. But, not being heavy will mean that it requires securing to a bench or table when printing and we will take a look at that a little later.

Jackson's Fome printing press

Fome 25cm press and blanket in box


Jackson's Fome printing press

All contents and very easy to follow instructions for assembly


Here we are unpacking the 25cm Fome etching press ordered with the blanket. On opening the box you will find just a few component parts and some very short and straightforward instructions for assembly.


Attaching the handle

You will find an allen/hex key included with the press and this is used to tighten the screw into the hole on the roller shaft. A little wiggling will help to locate this and you can then proceed to tighten. The screw is aligned exactly with the handle shaft so space is a bit tight (this looks like an aesthetic design decision). After a bit of fiddling it is easy to tighten up, but make sure the screw is well in so that it doesn’t catch on the table when turning. The crank handle is designed to be removable for transportation or storage of the press. You will see that this is a direct drive press, no gears are needed on a press of this size, and you can achieve a continuous turn of the roller with this design of crank handle.

Jackson's Fome printing press

Roller shaft and crank handle with fixing screw


Lifting and lowering the rollers

Both the upper and lower rollers are made from solid steel with diameters of 3.5CM. The lower roller has a serrated surface which helps it to grip the press bed as it turns. When adjusting the top roller always try to lift or lower both sides simultaneously, keeping the roller level as it moves up or down. This will prevent too much force being applied to the roller bearings.

Jackson's Fome printing press

Turning the handles simultaneously


The top roller can be lifted to a height of 1.7cm giving you the option of printing from the thinnest of intaglio plates as well as many types of relief plate including our 9mm Baltic Birch Plywood. Some adaptations are required when printing high relief and we will discuss that in the upcoming relief printing article.

Jackson's Fome printing press

Top roller has maximum clearance of 1.7cm which will accommodate many relief blocks


Jackson's Fome printing press

Top roller has maximum clearance of 1.7cm which will accommodate our 9mm Baltic Birch Plywood


Press Bed / Press Plate

The press bed, or plate as it is sometimes called, is made from 3mm thick steel. You will find that it comes with two metal pins that drop through holes either end of the bed. This is an optional safety feature and will prevent the bed from slipping out from between the rollers and you may choose to make use of them.

Jackson's Fome printing press

3mm steel bed with optional safety stop pin


Felt mat / press blanket

The press is supplied with or without a single blanket of compressed wool felt. Take care when you order to select the option you want. The single blanket should suffice for most of your printing, you can experiment but you may find you lose definition of fine etched lines if you do add a second blanket.


Securing for printing

The 25cm press weighs about 9 kilograms, which makes it very portable, but it really needs securing to a bench or a tabletop for printing. The steel side plates have holes cut near the base at either side and these should be used to attach clamps or bolts in a variety of configurations depending on your chosen set up. The holes are wide ovals of height 10mm and width 23mm at the widest points. The holes are also positioned with 10mm of side plate below them.

Jackson's Fome etching press

View of press side plate with holes


Jackson's Fome etching press

Press clamped to table top with Fome Clamps


If you want to secure the press to a tabletop then the simplest option is with C shaped screw clamps. You will only require one pair in order to successfully secure and print. Fome make a special clamp set RFCLAMP for the press, available separately. You will see a small notch in the top of the C which will grip the press side plate and prevent movement. The maximum aperture of the clamp is 45mm and an allowance of 10mm needs to be made for the side plate, therefore your tabletop needs to be under 35MM thick in order for the clamp to fit over it.

Jackson's Fome etching press

Sturdy C-clamps available on our website code RFCLAMP


It is possible to seek out other C shaped screw clamps from hardware shops but do keep in mind the size and shape of the holes in the side plate. You may find it easier if you trace a template for the side plate and take it with you to the hardware store for reference.


Securing to a solid bench

If you want to attach the press to a solid benchtop you may find the clamps are not suitable. We spent a little time shopping for just the right tools for the job, taking a paper template of the side plate for reference. Taking into account the size and position of the holes, we opted for two pairs of angle brackets with the holes appropriately located. These were screwed down onto a benchtop allowing a gap wide enough to accommodate the metal side plate of the press. We then used nuts and bolts through the brackets and plate. It is simple enough to undo the bolts to move the press.

Jackson's Fome etching press

A pair of angle brackets with a machine screw and hex nut


Jackson's Fome etching press

The angle brackets line up roughly with the side plate holes


Jackson's Fome etching press

Securing the side plate between the angle brackets


Another method we have seen adopted is to permanently secure the press to a heavy piece of plywood or MDF thus adding to the overall weight and then use C-clamps to secure the base to a tabletop.

Jackson's Fome printing press

The press screwed to a heavy sheet of plywood then clamped to a tabletop


Any of the above methods will secure the press adequately for printing under pressure without any movement.


Calibration and setting the pressure

This press has no gauge for calibrating, in fact for most presses, except the very large, calibration is best done by feel and by test printing. Before you start printing you can check that the pressure is adequate and even, by running your plate and printing paper through before you ink up. Doing a ‘blind’ print will allow you to inspect the plate marks (in the case of an etching) left indented in the paper, a good measure of correct calibration. By comparing the plate marks left by the sides of the plate you can check that the pressure is even across the roller. If you run your dampened paper through with the uninked plate you should be able to see all your etched marks embossed in the paper. Of course, an actual print will be the final indication that correct pressure has been set.

Jackson's Fome printing press

1mm zinc plate etching before inking


Jackson's Fome printing press

Running through with the same paper that we will be printing on


Jackson's Fome etching press

Comparing the plate marks on either side of the blind print


If you want a rough indicator, you can of course make your own gauge. Some printers glue a rule to the side plate or you can count the threads on the roller screws. But adjusting by eye and feel as you prepare for printing is a good warm-up exercise, while remembering that there are many variables in printing, not just the position of the roller. For example, the plate thickness, the paper quality, and dampening, as well as the plate inking and wiping – will all affect the final print.

Jackson's Fome etching press

A ruler to check the roller height

Jackson's Fome etching press

Counting the threads on the roller screw


Printing with the Fome etching press

The crank handle design means you can keep a continuous smooth action as you turn the roller. It is best to avoid stopping at any point during the pull through, this creates uneven pressure that can show as marks across the print. As mentioned before, the time you have taken to set the pressure by eye and feel, and doing a proof or two with the same paper you intend to print on, will mean that you will be ‘in the flow’ – warmed up and ready to print.

Jackson's Fome printing press

Turning the handle to roll the printing bed

Jackson's Fome printing press

Lifting the blanket

Jackson's Fome printing press

Carefully lifting paper by one corner

Jackson's Fome printing press

The etching made on 1mm zinc and printed on Fabriano Unica paper


More Printmaking Articles on the Blog

Look for our upcoming articles on printing with the Fome press for tips on avoiding plate slip and how to adapt the press for relief printing.

Mokuhanga: Japanese Woodblock Printing Materials

Chris Pig Introduces Sunome Senaka Printmaking Paper and Van Son Rubber-based Ink

Akua Intaglio & Akua Liquid Pigment

Linocut for Artists and Designers


Links to the etching press and materials at Jackson’s

Fome School Etching Press in 2 sizes (third size coming soon)

Fome Clamp pair

Jackson’s Baltic Birch Wood Blocks

The Printmaking Department at Jackson’s

The post Setting Up the Fome Etching Press appeared first on Jackson's Art Blog.

Intaglio Printing with the Fome Etching Press

$
0
0

In this second article in our series about the Fome Etching Press, our printmaking expert Jill Watton shows us how to use this popular intaglio printing press for intaglio printing and how to get the most from this great little printing press. She covers setting up for printing, intaglio plates, basic registration, and inks. The first article in the series covered setting up the press and the third and final article will cover adapting the press for relief printing.

Intaglio Printing With the Fome Etching Press

by Jill Watton

Fome’s fantastic small scale etching press remains very popular with customers across the world. Well-engineered and highly portable, the presses punch well above their weight when it comes to print quality. Manufactured by Fome, just north of Venice, the presses will print many types of intaglio plate including etchings, drypoints, engravings and collagraphs. Available in three sizes, 25cm and 18cm, plus the soon-to-come 30cm, the dimensions refer to the width of the bed meaning you can print up to A3 on the 30cm press, A4 on the 25cm press and A5 on the 18cm press.

Jackson's Fome printing press

The beautifully engineered Fome press.


In our previous article Setting up the Fome Press, we covered how you can best secure the press to a bench or table for printing. Our customer reviews have shared some helpful tips for optimising use of the press. One recurring observation, and one we have come across ourselves, is that sometimes the intaglio plate will slip as the roller reaches it during printing. It tends to occur more often with the thicker plates. We think it is due to the smaller diameter of the top roller meeting the plate at a less acute angle than would a large diameter roller. We have found some simple solutions to add to all those that our customers have already devised and will outline them below.


The Intaglio Plate

Jackson's Fome printing press

On the left 0.8MM economy zinc without a bevel, on the right 1mm zinc with edges filed to a bevel.


Jackson’s Transparent Printing Plate 0.75mm thickness


It is possible to print a range of thicknesses of intaglio plates on these presses including our 0.75mm Transparent Printing Plate and our 1.2mm Polished Copper etching plate. Collagraphs of various thickness will work too, bearing in mind that the top roller can be lifted to a maximum height of 1.7cm. Any metal etching plate of 1mm and over will need the edges and corners bevelled to protect the felt blanket, but the Jacksons economy zinc at 0.8mm can be printed without bevelling the edges. A second blanket can be purchased for the presses which you may find useful for printing thicker collagraphs, but one blanket is sufficient for most applications and in fact is better for printing fine line work.


Setting up the Press

Jackson's Fome printing press

A ‘blind’ print will reveal the pressure setting


Before you start printing you will need to secure the press to a tabletop or bench. We have described how you can do this in our previous article Setting up the Fome Press. One simple option is with a pair of C shaped screw clamps such as the RFCLAMP from Fome. Once you have the press in position you will need to check that the pressure is adequate and even. You can do this most effectively by running your etching plate and the paper that you will be printing on through the press, before you ink up. Doing a ‘blind’ print will allow you to inspect the plate marks left indented in the paper, a good indicator of correct calibration. By comparing the plate marks left by the sides of the plate you can check that the pressure is even across the roller. If you run the printing paper through dampened, you will see the etched lines embossed into the paper.


A Basic Registration System

intaglio printing press

The registration template underneath a sheet of transparent Mylar film


First up we will print a hard ground etching made on 1mm zinc plate. For the purposes of registration, we have drawn a simple template on a piece of paper and placed this underneath a sheet of Mylar film. The registration template shows a box, drawn in a strong marker pen, which will be the assigned position for the plate, and a cross of central lines both vertical and horizontal. We can mark the back of each piece of printing paper to line up with the cross when laying it over the inked plate. This is a very simple form of registration and works well for single colour prints by locating the plate to the right position on the paper. The film is a 125 micron Mylar Stencil Sheet 30x60cm. MYLAR2/2 cut to size and taped to the press bed with masking tape.

The next step is to prepare a number of small sheets of newsprint, you can use tissue also, enough for each print to be pulled. These are known as paper sliders. This is a really simple idea for positioning the plate over your registration template and is commonly used on all sizes of presses. The inked plate can be placed carefully down and then slid into position. The dark outline of the print box can be seen through the paper.


Printing With Oil-based Inks

For our Fome press, to prevent any potential slip of the plate, we have found the simplest solution to be lightly dampening the paper slider. A light spray of water is enough, you will find this is all that is needed to keep the plate in place. You can do the same when printing straight on the metal bed, it works just as well.

One thing to be aware of though is this technique is not so suitable for printing with water mixable (water washable) oil-based inks such as Caligo Safe Wash. The excess water held in the slider causes the ink to bleed slightly when subjected to the huge pressure of the press rollers. When working with water mixable/water washable oils we need a different technique to prevent the plate slipping, which we will look at shortly.

Jackson's Fome printing press

Dampened newsprint placed over the Mylar with the registration template visible through it, this is the paper ‘slider’ on which you place the inked plate.


Jackson's Fome printing press

The inked plate in position on the bed


We have inked the 1mm zinc plate with Cranfield Traditional Etching Ink in carbon black tinted with a little madder lake, these are traditional style inks made with pigment and linseed oils and are not to be confused with water washable or water-mixable inks. The inked plate can then be placed on top of the dampened newsprint and slid into position. The dark outline of the registration box is visible through the slider so the plate can be correctly located.

Jackson's Fome printing press

Lining up the marked printing paper


Each sheet of printing paper has been marked on the reverse and is lined up with the registration template. Here we are laying down our dampened Fabriano Unica paper.

Jackson's Fome printing press

Lifting the blanket after running the plate through


Jackson's Fome printing press

Slowly lifting the paper by the corner


Jackson's Fome printing press

Hard ground etching on 1mm zinc, printed in Cranfield Traditional Etching Ink Carbon Black/Madder Lake. The paper is the fabulous Fabriano Unica in white.


Printing With Water-washable Inks

The dampened paper sliders will introduce excess water that will dilute these new types of ink when printing on an etching press. The simplest way to prevent the plate from slipping when using water washable ink is to place it on a sheet of paper with a bit of tooth or slight texture that you have taped to the press bed. You can create a similar registration template on this sheet. If you clean the back of the plate before printing you can re-use this sheet, or you can pre-prepare a sheet for each print. Here we have used a sheet of A4 writing paper that is not too smooth.

intaglio printing press

The inked etching plate placed onto a slightly textured paper taped to the press bed


intaglio printing press

The press is secured to the studio table with Fome clamps RFCLAMP. The crank handle design ensures an uninterrupted rotation of the rollers


Jackson's Fome printing press

Hard ground and spray-can etching on 0.8mm economy zinc. Printed with Caligo Safe Wash brown-black on Fabriano Unica white.


Hard ground etching using BIG Ink Ground on a 1mm polished zinc plate.

intaglio printing press

Hard ground etching using BIG Ink Ground on a 1mm polished zinc plate.


Do take a look at the customer reviews on our website to see how other printmakers work with the presses. For tips on securing the presses before printing take a look at our previous post Setting up the press We will have some helpful ideas on relief printing with the press in the third article coming in the series.


More Printmaking Articles on the Blog

This is a part of a series of three articles on the Fome press, look for our upcoming article how to adapt the press for relief printing and our earlier article on setting up the press.


Links to the etching press and mentioned materials at Jackson’s


Postage on orders shipped standard to mainland UK addresses is free for orders of £45.

The post Intaglio Printing with the Fome Etching Press appeared first on Jackson's Art Blog.


Relief Printing with the Fome Etching Press

$
0
0

In this third and last article in our series about the Fome Etching Press, our printmaking expert Jill Watton shows us how to adapt this popular intaglio printing press to be able to use it for relief printing and how to get the most from this great little press. She covers raising the height of the roller, calibrating the pressure, and then takes us through printing a single colour linocut. The first article in the series covers setting up the press and the second article shows how to use it for intaglio printing.

Relief Printing on the Fome Etching Press

by Jill Watton

Jackson's Fome printing press

Fome Etching press showing the safety stop pin


Jackson's Fome printing press

The beautifully engineered Fome press. Secure it to a table or bench before printing. See our earlier blog article about setting up the Fome press.


Etching presses such as this one by Fome have long been utilised for the production of relief prints. For linocuts, woodcuts or other forms of relief, an etching press allows for speed of printing as well as good, even pressure. The top roller of the etching press can be raised up to accommodate blocks and plates of various thicknesses. So long as the roller is running at about the right height when it reaches the block, a print can be taken without the block or paper moving since the roller doesn’t have to ‘climb’ the printing block. In a similar way, for those printmakers interested in letterpress, etching presses have also been utilised for printing from photopolymer plates. Embossing, which is now quite desired in letterpress prints, can be achieved on an etching press adapted for relief printing.

Jackson's Fome printing press

Top roller has maximum clearance of 1.7cm which will accommodate many relief blocks. Shown here are a variety of thickness and types of material.


Raising the Roller Height

The top roller can be raised to a maximum height of 1.7cm. Here, as an illustration, we see Jackson’s grey unmounted lino 3.2mm thick, Speedball Speedy Carve 6mm thick, and Jackson’s Softcut at 3mm thick sitting under the raised roller. We have also used the press to successfully print from the 9mm Baltic Birch Plywood. Often plywood cannot be guaranteed to be completely flat and on larger presses with larger sheets you can encounter uneven pressure but on this small scale the press copes very well.

relief printing press

Plywood 9mm thick can be accommodated under the roller when lifted.


The simplest method of setting the roller to the right height is by utilising ‘runners’. These runners are long thin strips of material that are the same height as the block you are printing from, and are used on all sizes of etching press. You might find printmakers referring to them using the terms ‘roller bearers’ or ‘rails’. Made to run the whole length of the press bed, printmakers will often cut them from exactly the same material as the printing block. However it can sometimes be difficult to obtain enough length in the particular material you are using. Strips of mount card built up in layers is another option. If you have a number of pairs of strips of card you can add and subtract to adjust the height of your runners to match your relief block.

relief and etching press

Runners made from strips of mount card.


Here two runners have been made from a double layer of mount card, these runners are not quite as deep as the Japanese Vinyl printing block but would work fine. However they were a little too wide to accommodate any paper border around the image.

relief printing press

Two runners cut from the same material as the printing plate.


In this example we have cut two runners from the same material as the printing plate, in this case Japanese Vinyl. We have had to join two shorter lengths together to create runners that extend the full length of the bed which will maximise your printing area. You will see there is now space around the printing block to accommodate a paper border around the image.

relief printing press

The blanket needs to be inserted under the roller before the pressure is adjusted for printing.


Calibration and Setting the Pressure

This press has no gauge for calibrating, in fact for most presses, except the very large, calibration is best done by feel and by test printing. Before you start printing you can check that the pressure is adequate and even by running your block through before you ink it up. Doing a ‘blind’ print will allow you to inspect any marks left indented in the paper, a good indicator of how much pressure you have and whether you want to adjust it. Of course, an actual print will be the final indication that correct pressure has been set.

Before you do this you will need to secure your runners to the press bed, masking tape will suffice. You will need to insert your blanket and decide whether you want anything between your blanket and the printing paper. We are printing here with just the blanket and you will see we get some embossing. This works well on single colour prints and is also an aesthetic consideration.

If you are going to print more than one colour and need accurate registration then embossing can be a hindrance. You can experiment with card instead of a blanket, a rubber sheet, or a sheet of blotter inserted between the printing paper and the blanket. Some printmakers will print with a sheet of plywood between the paper and the top roller but this is best on larger presses where you can raise the roller higher.

linocut printing press

Plenty of pressure can be achieved using this method as you can see from the embossing on the back of this print on Awagami Bamboo paper.


A Single Colour Linocut on Japanese Vinyl

The smooth reverse side of Japanese vinyl can slip a little on the metal bed. In order to prevent this we have taped down a sheet of paper with a little texture to the press bed. Something like cartridge paper will do. Other materials may not need this at all, a little trial and error is inevitable when setting up, to meet your own requirements. You can make use of this sheet to draw on some registration guides which will allow you to locate your print where you want it on the paper.

Jackson's Fome printing press

The paper is taped to the press bed to prevent the block from slipping. It can also be used to draw on registration marks.

Jackson's Fome printing press

Our vinyl block is inked with Cranfield Letterpress Ink in Carbon Black.

Jackson's Fome printing press

Laying down the paper, Fabriano Bioprima, and lining up the registration marks.

Jackson's Fome printing press

A linocut on Japanese Vinyl, printed with Cranfield Letterpress Carbon Black on Fabriano Bioprima.


Using runners, or rails, is only one method for printing relief on an etching press. Artists sometimes build a frame around the block to form a sort of ‘chase’ and this can work well on larger presses with thicker blocks. The inked block can be placed inside the chase and locked in with other blocks of the same height. If you want to try something like this then you will need to watch out for any embossing of the paper border and you can do this by considering whether you use a blanket behind the paper or something firmer as discussed earlier.

Jackson's Fome printing press

Jackson’s Traditional Lino inked up in Cranfield Letterpress carbon black.

Jackson's Fome printing press

The reverse of the paper, Awagami Bamboo, before lifting off the block.

Jackson's Fome printing press

Linocut made using Jackson’s Grey Lino, printed with Cranfield Letterpress Carbon Black onto Awagami Bamboo 110g.


Do take a look at the customer reviews on our website to see how other printmakers work with the presses, there is a lot of shared information available. For tips on securing the presses before printing take a look at the first article in this series Setting Up the Fome Etching Press. We have some helpful ideas on intaglio printing with the Fome presses take a look at the second article in this series Intaglio Printing with the Fome Etching Press.


More Printmaking Articles on the Blog


Links to the etching press and mentioned materials at Jackson’s


Postage on orders shipped standard to mainland UK addresses is free for orders of £45.

The post Relief Printing with the Fome Etching Press appeared first on Jackson's Art Blog.

Making Woodblock Prints

$
0
0

Making Woodblock Prints is a DVD workshop taught by master printmakers Merlyn Chesterman RE and Rod Nelson, filmed in Chesterman’s North Devon studio. It covers essential topics, including mark making techniques, planning a print, and creating registration blocks.

Sarah Edmonds has written an in-depth review of the DVD course.

Making Woodblock Prints

Making Woodblock Prints is an educational film taught by master printmakers Merlyn Chesterman RE and Rod Nelson. It follows on from their popular book of the same title published in 2015. Having worked alongside each other as printmaking contemporaries for many years, they felt it was time to share their knowledge in a more accessible format. This two hour workshop covers nine topics, from essential tools to advanced techniques. It is an easy to follow introduction to, and appreciation of, the ancient art of woodblock printing.


Merlyn Chesterman demonstrating woodblock printmaking at Art in Action

There has been a meteoric surge in the creative arts during lockdown – it’s no surprise. The act of creating is something within our control with tangible results. It offers stress relief, absorbing our anxious thoughts and boosting our self-esteem. With just a few portable materials and a bit of guidance, everyone can enjoy the benefits of a focused, meditative activity. The proliferation of online opportunities to learn from experts means that anyone in the world can acquire new skills.


Rod Nelson in his studio inking up.

With that in mind, the launch of this new DVD is perfectly timed. Nothing beats working alongside a tutor, but this two hour masterclass definitely comes close. Merlyn and Rod between them have decades of experience. ‘We’ve been woodblock printmakers for many years and we’ve learnt many things from around the world. In this video we’re going to share with you what we know.’ Filmed on location in Merlyn’s cavernous studio on the North Devon coast, where she has worked for many years, we see an enviable collection of tools, paper, tins of ink, drying racks and tantalisingly beautiful pieces of wood.


Merlyn Chesterman at the press printing We Swam into the Dancing Light V2, a still from the DVD

The film begins with Merlyn exploring a range of woodblock prints by artists from across the centuries, including prints made by students in her workshops, giving a sense of the expressive possibilities of the medium. The scope of mark-making techniques is demonstrated alongside how tools can be used by varying their angle, grip and movement through the wood. Rod explores suitable types of wood – comparing the qualities of Douglas fir, poplar and shina plywood as well as the possibility of incorporating the grain of found wood and scaffold planks. Some really useful time is spent covering composition, thinking about balancing percentages of black and white and considering the difference between black on white and white on black. Planning your print is essential, not least because of the reversal of your initial drawing, the more time you can spend at this stage, the more successful the outcome. ‘You can’t unmake your mark. You have to make a commitment.’


woodblock printing

Shadow Falls with shadow, 2019
Rod Nelson
Woodblock print, 70 x 80cm | 27.5 x 31.5 in.

‘Listen to the sound of the tool, it’s a great sound. The first cut is done….’ Rod’s passion for his craft is clear throughout. It would be hard to find a better way to learn than from the close up shots – the precision and skill is admirable, you will be watching and learning without even realising. Rod talks about the speed and fluidity of the cut making an enormous difference to the finished print and suggests changing tools frequently to benefit from different marks – ‘I’m changing tools in the interest of liveliness,’ he confirms.


We Swam in to the Dancing Light Version 2, 2019
Merlyn Chesterman
Woodblock print, 20 x 30cm | 8 x 12 in.

When you are ready, you can graduate to the really exciting bit – inking your first proof! The aim is to create a ‘smooth, even carpet of ink across the surface’ of your table, piece of glass or perspex. It’s a ‘bit of a big moment’ says Rod – you’ll get the first clue as to how your print is going to end up – your image is beginning to emerge. Roll the ink on a diagonal across the block and that’s where the magic happens, ‘Every time I ink the woodblock, I get a thrill from what I’m doing!’


Merlyn Chesterman printing A Prevailing Wind

Developing your image further from your early proof is discussed and we later see Merlyn demonstrating inking colour blocks with graduated tones. Her technique of applying a tonal range of inks directly onto the roller is fast, painterly and thrilling to watch. We are also shown how to create a registration block for small prints as well as a system for effectively printing multi-colour large scale prints by hand.


Tide Race – memories of Start Point, 2019
Rod Nelson
Woodblock print, 39 x 88cm | 15 x 34.5 in.
Edition of 50

Merlyn Chesterman and Rod Nelson became friends through a common enthusiasm for the work of Japanese printmaker Shiko Manukata – part of that influence was the speed in which he worked. Much of their work draws on the vibrant, living traditions of China and Japan – the links are still very evident in the world of printmaking today – the bamboo leaf covered baren tool and the pink painted woodblocks – a Chinese idea.
The quality of teaching throughout makes this DVD such a sound investment. Both tutors have an impressive pedigree and their passion for the art form is evident, whilst their approach is still very accessible. There is a quiet confidence and authority that can only come from a lifetime of dedication to their craft – you couldn’t hope to find two more committed teachers. ‘Very instructional and enjoyable. I know workshops can be great, but I found this video better for learning personally’, explains a student.


woodcut printing

Bent Tree, 2012
Merlyn Chesterman
Woodblock print, 20 x 30cm | 8 x 12 in.


About the artists

Merlyn Chesterman RE
Merlyn is a Fellow of the Royal Society of Painter-Printmakers, author and teacher at West Dean College of Art and Conservation. She has studied printmaking in China and exhibits internationally, with her work gracing collections at the V&A, Ashmolean Museum and the home of Princess Ashi Tashi Dorji of Bhutan among others. Her passion for printmaking has sustained her since studying as an undergraduate at Bath University and it’s taken her all over the world.

In 2018 she embarked on a residency at the Kadoorie Farm and Botanic Garden in Hong Kong, a nature conservation, education and sustainable living reserve. She made a woodcut from a large piece of camphor endgrain, a hardwood taken from the hillside. Much of her work is intertwined with the landscape in this way. Living on the North Devon coast her Instagram page is peppered with sea swimming, rocky coves and windswept stone outcrops. The resulting woodcuts are breath-taking, full of light and drama, and often on a large scale. ‘There is joy to be had at every stage. The beauty of materials, variety of processes and the excitement of lifting the print for the first time,’ says Merlyn Chesterman.

Rod Nelson
Rod is a prolific printmaker. He has spent a lifetime dedicated to his craft and regularly exhibits with the Royal Society for British Artists and annually at the Royal Academy Summer Exhibition. There is no real distinction between woodblock printing as a job and as a way of life. Such dedication has seen him take up a residency in Sigmaringen, Germany; see success in his recent one man show at the Paragon Gallery in Cheltenham; and self publish a book complete with his own illustrations relating to his personal experience of COVID 19. Rod is a curious man, a Green Party activist, sensitive to his fellow human and alert to world events. Both artists are busy and totally engaged in woodblock printing. ‘Woodblock prints have a quality and power that cannot be found in any other medium,’ says Rod Nelson. Rod Nelson on Instagram.


Woodblock Printing at Jackson’s


Image shown at the top:

Shore Break, 2020
Rod Nelson
woodblock print, 66 x 90cm | 26 x 35.5 in.

The DVD was produced by Artisan Media.
Text was written by Sarah Edmonds.

The post Making Woodblock Prints appeared first on Jackson's Art Blog.

Printmaking: Comparing Lino, Softcut, Speedy Carve and Japanese Vinyl

$
0
0

Linocut printing is a relief print process that involves cutting into a sheet of lino, applying ink to the uncut shapes and lines, and then printing on to a flat surface, usually paper. Lino is an abbrieviation of linoleum, the material associated with kitchen floors, which was originally made of cork and pigment mixed with oxidised linseed oil, and backed with a loose weave hessian. Nowadays, alternatives to the traditional battleship grey lino include a variety of substrates made of PVC including Softcut, Speedy Carve and Japanese vinyl. Below is a summary of the main differences, along with some tips on how to get the most from your linocut printing session.


As mentioned in Colin Blanchard’s article on his recommended tools for linocut printing, you can divide the different cuts you will want to employ in your lino printing into three main groups: fine lines, dashes/textures and clearing. Five Pfeil tools are a lifelong investment for relief print (both wood and lino) with regular sharpening. However there are other good relief cutting tools available, including those by Flexcut, Jackson’s woodcut tools (which can also be used for lino) and RGM.

Cutting fine straight and wavy lines, clearing a broad area and cutting to the edge of the block demonstrates the differences in character of each of the blocks, the results of these tests are below. Following this you’ll find my tips on the best ways to draw your design on to your block. Finally you’ll see how these blocks fair when inked up and printed, using Caligo water based ink and Strathmore Printmaking paper.


First Impressions

The grey lino is the stiffest, hardest block out of the four. It has a very slightly dimpled surface and a hessian backing. On occasion, battleship grey lino will have a slight curve, caused by the lino being stored on a roll. This can make a very even print more difficult – especially when using a press – so if you are after a very uniform layer of colour in your print I suggest gluing your lino to an MDF or plywood board – making sure that you apply substantial weight to your block as the glue dries, to stop the lino bouncing back to its curved state.

Softcut is creamy-beige in colour, and has a smooth glossy surface, with a matt texture on the reverse. It is very flexible, but not spongey – it does not easily compress if you apply pressure to its surface.

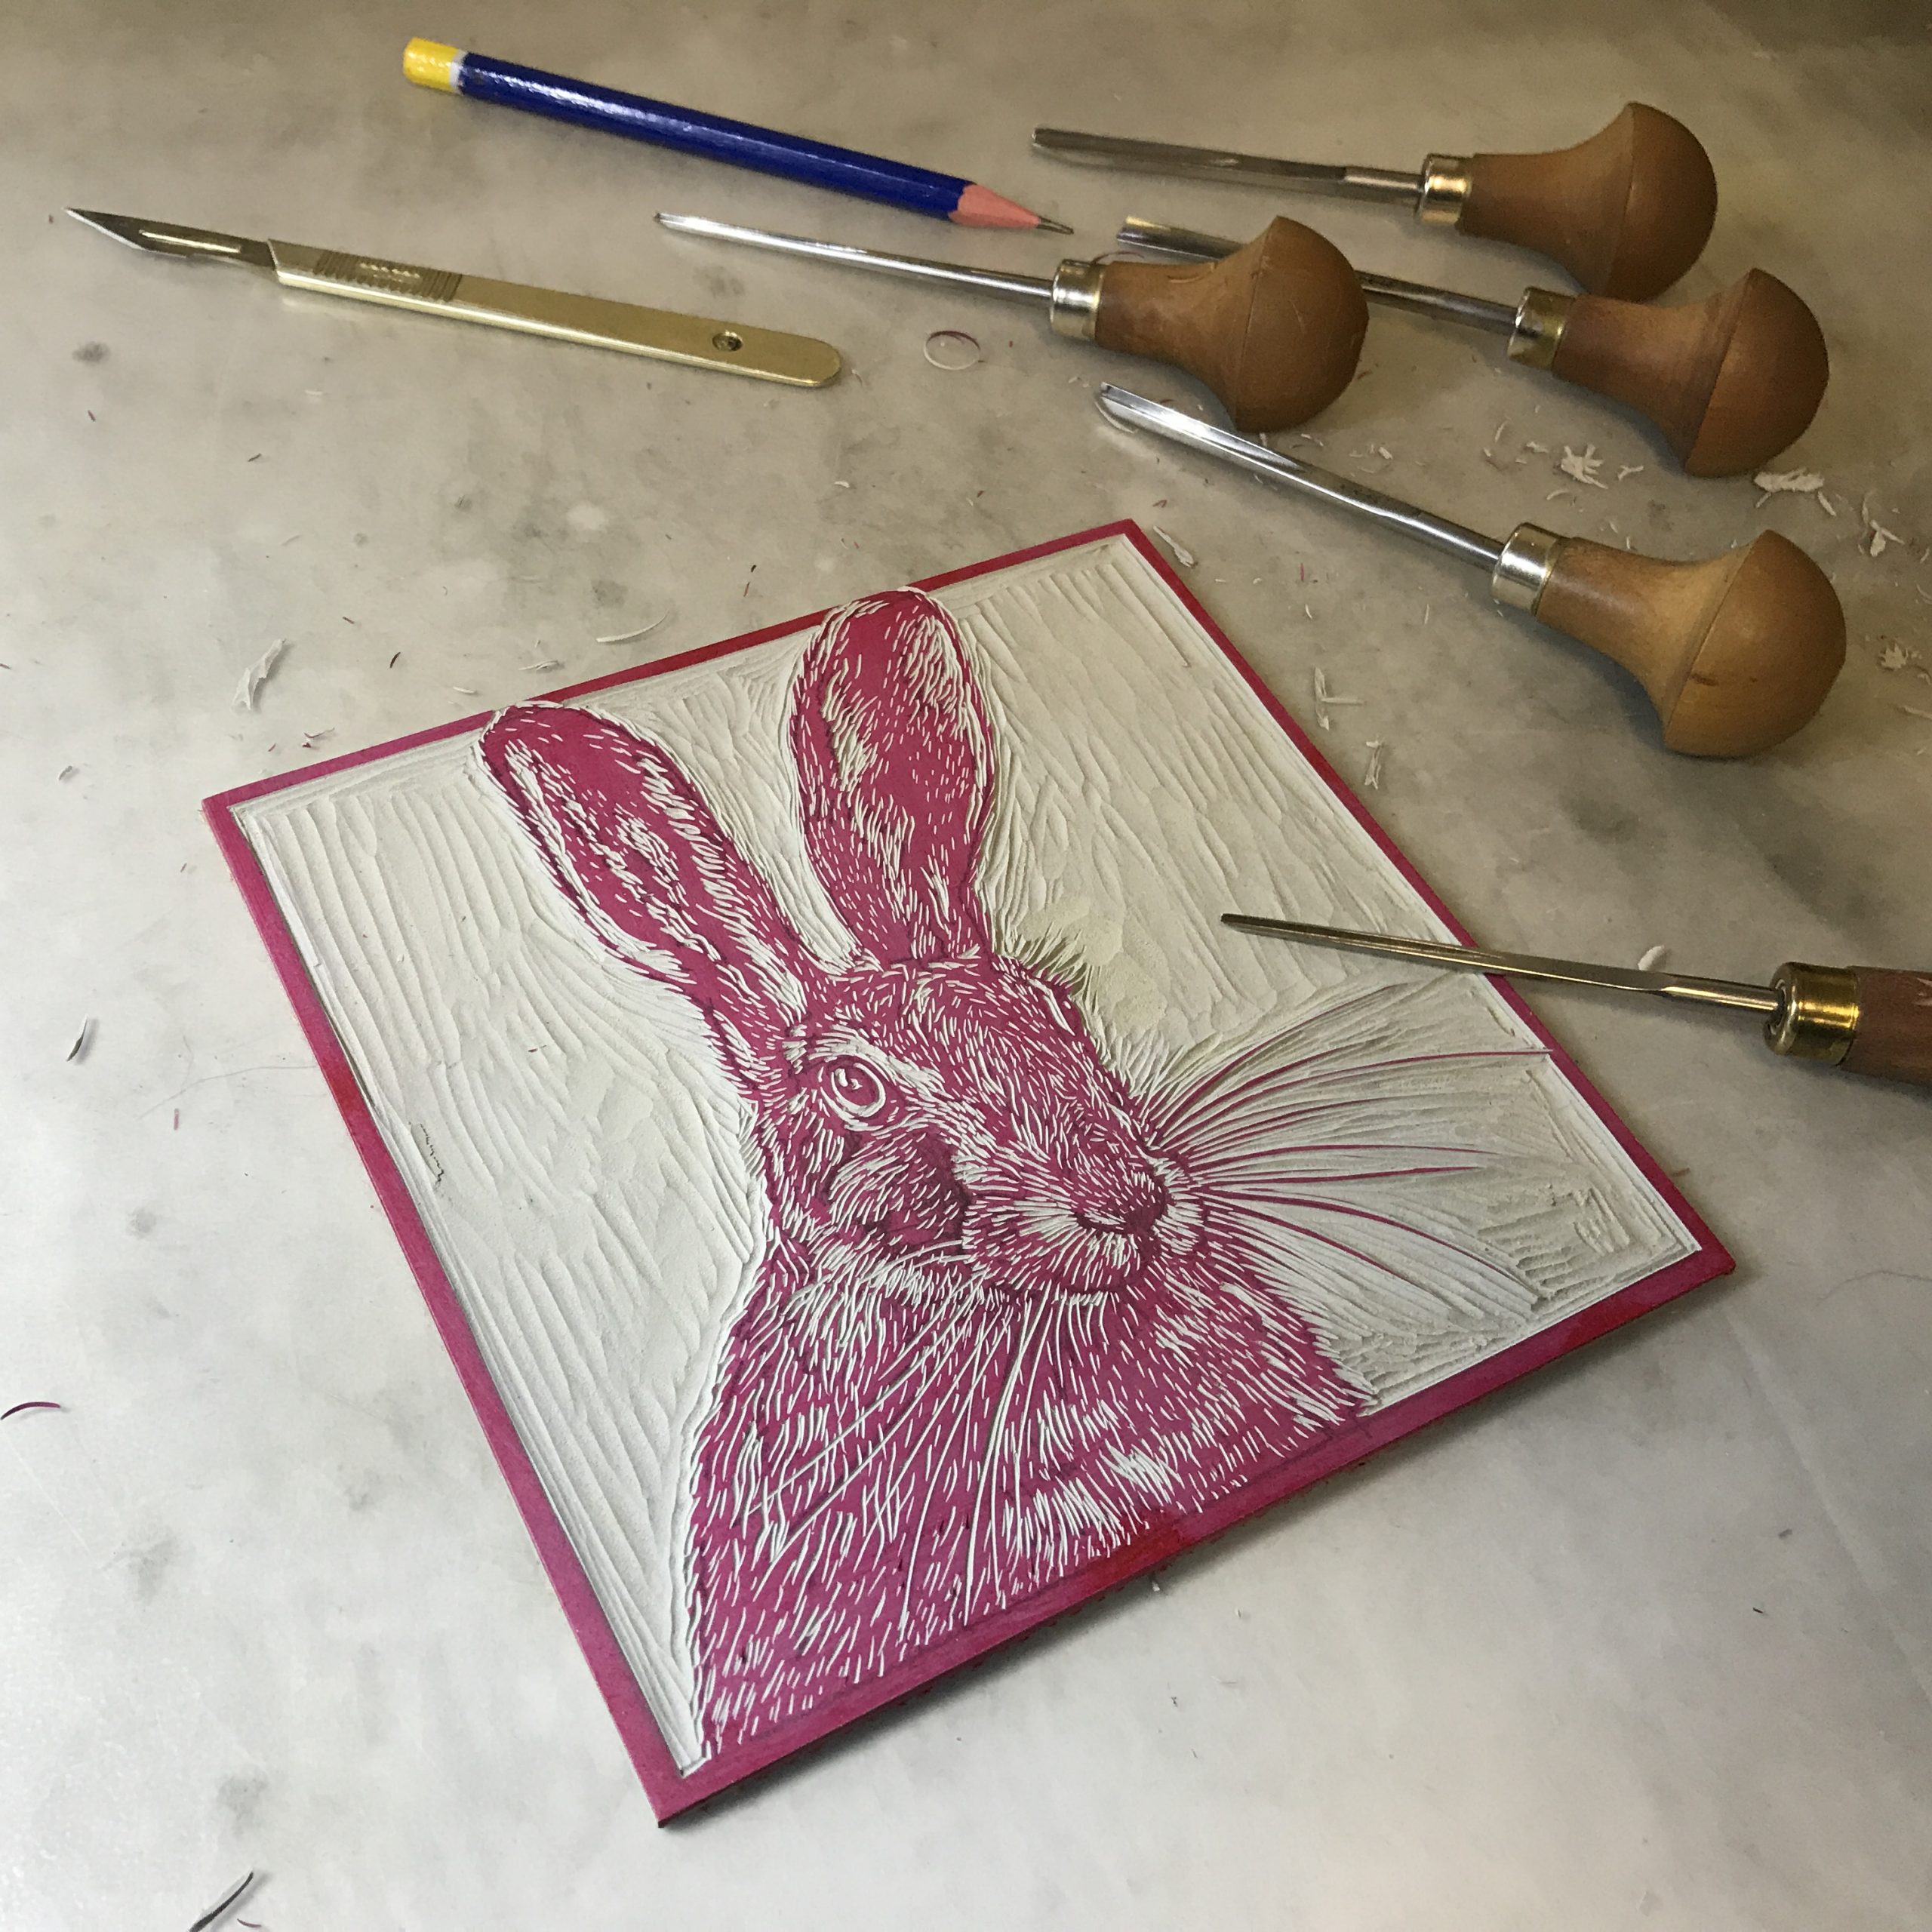
Speedy Carve is pink, and even bendier than Softcut, in fact it would be ideal for printing on a curved surface. It has a slightly spongy feel when you press into it. It is a popular material for stamping, rather than relief print – and so is made with printing by hand in mind. It is double sided.

Japanese vinyl is perhaps the most stylish-looking of the relief print blocks, with a green side, a blue side and black core. You can carve both sides, and the black core makes it easy to see where you have cut. It is more rigid than Softcut but has a degree of bendiness.


Clockwise from top left: Traditional grey lino, Speedy Carve, Japanese Vinyl and Softcut.


Which Lino Block Is the Most Eco-friendly?

As linocut tends to accumulate a lot of offcuts destined for the bin, I feel it important to point out that battleship grey lino is the only fully biodegradable of the relief print blocks, and will not release harmful gases or toxins as it breaks down. The other blocks are made from PVC and can be recycled, although to find a means of recycling your relief print offcuts may prove difficult. However, PVC production requires relatively low energy in comparison to other plastics, and because it is relatively resistant to breaking down, only releases small quantities of dioxins. It is one of the more eco-friendly plastics, but using wood from a sustainable source or genuine lino will always be more eco-friendly.


Cutting Fine Lines

Fine lines are often the first cuts to be made when carving a relief print. It’s a good idea to use a fine line to outline shapes before clearing the remaining lino, as it can help prevent slips and unintended cuts. Fine lines can also be employed for hatching and cross hatching effects as well as textures, such as fur or hair.

A good technique for making a controlled line is to rest the index finger of the hand you are holding your tool with, on the top of the blade, but then use the index finger of your non-cutting hand to help steer the blade in the direction you are going. This should help to even the pressure out across both hands. And of course, never cut towards yourself or your non-cutting hand – by turning the block you can ensure your blade is always pointing away from you.

Needless to say, the harder the block is the harder it is to cut, but that’s doesn’t mean that a softer block is superior, as it can be easy to slip and cut where you didn’t intend. It can also be harder to control the depth and width of a line. If you find your grey lino too hard to cut into, a top tip is to warm it first as this helps to soften it. Either sit on your lino while you have a cup of tea, or iron it on a low temperature, or put it on a radiator for 5-10 minutes. If it gets almost too hot to handle, it will be more likely to crumble as you cut it (especially if your cuts are too deep) so exercise caution!


As grey lino is the hardest of the blocks, good technique can help a lot in achieving even cuts without putting too much pressure on your fingers. If you can, practice on a separate offcut before you embark on your work so that you can familiarise yourself with how hard your block is and practice your cutting technique. For a fine line, you only need to make a 1 – 1.5mm deep cut in order for the line to register on your print, and there is no benefit in cutting any deeper, which would make the cutting more difficult.


Cutting wavy lines are generally trickier. You need to go fairly slowly and turn the block when you can, in order to achieve a flowing wave (I hasten to add, cutting waves in lino is much easier than cutting into wood!). The hardness of the grey lino helps to keep the cuts even and flowing.


Softcut by comparison to grey lino is easier to cut in general, but the block certainly feels more elastic. With grey lino there is a satisfying ability to flick and break the end of a carved line, but the elasticity of Softcut demands that you scoop your cutting tool upwards to end the line, which can be easy to forget if you are unused to Softcut. If you reach the end of your line and the cut has not broken away from the block, you could try pulling it off with your fingers, but this may tear the block slightly and cause the cut to go on for longer than you wanted.  Wavy lines are a little more unpredicatable, the edges of the lines are at times a little rough and jagged. A greater familiarity with this block will no doubt help!


Speedy Carve is even softer than Softcut and the tool glides through the block. Its softness means you need to practice to ensure an even thin width and depth. Because of the need to raise the tool up in a scoopy action to end a cut line, the lines tend to appear to have tapered ends, although this can be minimised with practice.


The Speedy Carve can be a little difficult to control when cutting wavy lines – with the softness of the block making it easy to slip as you are cutting and therefore undermine a controlled, flowing line. Such issues will disappear with practice.


Japanese vinyl is softer than grey lino but harder than Softcut or Speedy Carve. The black core is very useful in being able to see where you have cut clearly. Cutting wavy lines is relatively easy in comparison to the softer blocks.


Clearing

Clearing refers to removing a whole area to leave an unprinted shape in your linocut. I have found the quickest way to clear large areas is to use a large U shaped tool to cut out parallel lines across the area you wish to clear, and then employ a flattter and broader U shaped tool to cut inbetween the original cuts. This is easier than cutting into an entirely uncut expanse of lino.


The key with grey lino is to go slowly to avoid slipping, and use both hands where you can for maximum control.  The cuts will then have clean edges. If you are clearing a large area, its common for chatter to creep in at the printing stage – this is when ink reaches the inevitable ridges found within a cut area. This is the greatest bugbear of many linocut printmakers! You could consider incorporating chatter into your work and deliberately clear in a certain direction so that the chatter marks complement more intended marks. Or, if you don’t like the sound of this, you can wipe ink away with a rag (I would use a clean dry rag and avoid water or solvent as this can result in smears or grease marks in your print).


Another solution is to make a paper mask to cover your cleared areas – very thin paper such as newsprint is ideal as it is less likely to get in the way of the printing process. In my experience, there is no point in trying to smooth out all the ridges in the cleared area as no sooner as you have cleared one ridge you will inevitably create two more!


Cutting right to the edge is easy and satisfying with grey lino, the cuts are clean and the lino breaks away easily. By comparison, Softcut is easier to clear with, a Pfeil tool glides through the block with ease. When cutting to the edge of the block, the plastic has a tendency to fold over itself, and as a result my attempts to cut right to the edge are scuppered, leaving a little uncut border on the edge (illustrated below). This is easily rectified by cutting back from the edge inwards, but adds time to the process and is a little more fiddly. Clearing and cutting to the edges on a block of Speedy Carve was a similar experience. With a thickness of 0.6mm, it is twice as thick as the other blocks, and this combined with its softness means it’s possible to inadvertently make unecessarily deep cuts. To avoid this it’s really important to use both of your hands to steer the cutting, and also to ensure you have your block on a completely flat surface.


Clearing an area in Japanese vinyl was a similar experience to Softcut as well. If you want to minimise the amount of scooping (and possible tapering of a cut) that you need to employ in order to make a clean cut, you could use a scalpel to create clean edges at the end of your cuts. This would then allow you to keep your cuts at a similar depth for the whole length of a cut, and minimise chatter. Although the edge of a block does fold over itself to a degree when cutting to the edge of Japanese vinyl, it doesn’t stop you from making a cut right to the very edge, so in this sense the Japanese vinyl is more like the traditional lino than the Softcut or Speedy Carve.


Transferring Images on to Lino

A popular way to transfer a design on to lino prior to cutting is to use carbon paper. By placing your design on to your block with a sheet of carbon paper face down in between, you can then use a sharp point such as a pencil to go over the lines of your drawing, and the pressure will transfer carbon on to your block. Carbon paper is not recommended for use on Softcut or Speedy Carve. These blocks are too soft and rubbery, and too much of the carbon transfers on to them. The process becomes very inaccurate and if making a multi-block print, could cause real problems when registering separate layers at the printing stage.  Instead, I recommend drawing your design on tracing paper using a soft pencil, then placing the drawing face down on your Softcut or Speedy Carve and going over the back of your lines with a sharp, hard H or 2H pencil. This is a much more accurate way to transfer an image (you can also do this on traditional lino). This technique will also ensure your design is transferred back to front, which is what is needed for the printed image to appear the right way around!

Indian ink pens and Sharpie pens are also great for drawing designs on all these blocks, although be aware that sometimes these marks will transfer on to your paper when printing. If this happens at the proofing stage try wiping the block with a little rubbing alcohol or methylated spirits on a rag to remove the marks, then allow to dry before you ink up again.

White pencil is a smudge proof medium for drawing on to relief print blocks and works best on grey and Speedy Carve. It is not recommended for Japanese vinyl or Softcut as it is very faint and rubs away easily on these surfaces.


Printing the Blocks

I tried printing with each block twice – once by hand using a baren and then using an Albion printing press. A baren is a disc traditionally made from a coil of string wrapped in a bamboo leaf. It is designed for use in Mokuhanga printmaking but is a popular tool for burnshing all relief prints made by hand. An Albion press is a vertical pressure iron hand relief printing press that was invented by Richard Whittaker Cope in 1820, and is known for its ability to produce a high degree of uniform pressure.


The Difference Between Printing by Hand and Printing with a Press

Printing by hand is no better or worse than printing using a press – it’s just different. When printing by hand you can control how much pressure you apply, increasing or decreasing the saturation of colour applied as you wish. Hand pressure will be much less than the pressure you can achieve with a press, and so you’re more likely to achieve a textured layer of colour (although you can also achieve this with a press too!). You can apply pressure using a baren or a spoon (wooden or metal), and thinner papers will be easier to work with, as you won’t need as much pressure. Printing by hand is more time consuming, but also allows you more control.

By contrast, using a press will produce an even pressure across your print, quickly. This is particularly desirable when producing an edition of prints, and the same amount of pressure is needed across the image.  You can use papers of any thickness, although thicker printmaking papers (such as Stonehenge or Fabriano Rosaspina) will also allow you to introduce an embossed quality to your work if desired.


Lino

Lino, Hand printed


Here you can see the tiny dots of white in the printing, where the ink has not applied. This is partly because of the amount of pressure I applied and also partly because of the slight texture on the surface of the lino (which can be sanded away). Some of my finest lines were flooded with ink, which indicates I need slightly deeper cuts.  Here’s what happened when I printed using the press:


Lino, Press printed


Here you can still see the texture of the lino, but the white dots have now gone, thanks to the higher degree of pressure. This has also pushed some ink into the other marks, including the wavy lines and the cuts to the edge of the block. The area I cleared has less crisp edges than the hand printed block, but this can be remedied by reducing the amount of pressure.


Softcut

Softcut, Hand printed


The Softcut prints beautifully by hand, because the surface is smooth the amount of texture you can get is wholly dependent on the pressure you apply. The marks have a clean cut quality.


Softcut, Press printed


When printing with a press, the marks flooded a little, but again this can be controlled by reducing pressure. Other than that the Softcut withstood the vertical pressure of the press very well. I have used Softcut in an etching press and it was prone to slipping and the cuts closing in under pressure, but these issues did not occur during this test.


Speedy Carve

Speedy Carve, Hand printed


The printing results of Speedy Carve were very similar to Softcut when printed by hand, although you don’t need as much pressure. It’s clear why this is such as popular material for stamping. It prints beautifully with lovely clean cut edges.


Speedy Carve, Press printed


By contrast, I would not recommend Speedy Carve for use in a press. It’s too soft and spongey, and as a result cuts do not appear crisp. The evenness of the print was great, but if I were to reduce the pressure to try and achieve cleaner cuts, this evenness would not be guaranteed. The smudgey edges of the overall rectangle show how the block has squashed in the press during the printing.


Japanese Vinyl

Japanese Vinyl, Hand printed


Another completely smooth surface, Japanese vinyl is a great surface for hand printing with, you can achieve an even colour with not too much pressure, and the cuts appear with clean edges.


Japanese Vinyl, Press printed


Japanese vinyl is very well suited to printing with a press as well, with clean looking cuts, and a good impression of a layer of colour.


Summary

If you intend to print using a press and edition a number of prints, traditional lino or Japanese vinyl are both great choices. Softcut works as well, but is better for smaller sizes of work. All of these blocks are suited to hand printing, although you may need to lightly sand your grey lino if you wish to have a relatively even print texture. The ease of cutting Speedy Carve makes it ideal for making irregular shaped prints or stamps.


Related articles:

5 Recommended Pfeil Tools for Linocut by Colin Blanchard

Sharpening Linocut Tools by Colin Blanchard

Rachael Louise Hibbs: Botanical Inspired Linocut Prints

Relief Printing with the FOME Etching Press


Relief Printing at Jacksonsart.com


The post Printmaking: Comparing Lino, Softcut, Speedy Carve and Japanese Vinyl appeared first on Jackson's Art Blog.

Everything You Need to Know About Printmaking Paper

$
0
0

There is an interwoven history of papermaking and printing criss-crossing back and forth over centuries. Paper was not necessary for the invention of printing, but printing would not have been a commercial success without it and led to the explosion in paper production across the globe. This comprehensive overview by Jill Watton, details the history and characteristics of today’s leading printmaking papers, and how they can help you achieve the qualities you seek in your work.

Above image: Awagami Kozo paper


History of Printmaking Paper

Block printing was practiced in China 1400 years ago using paper, a multifunctional product manufactured into hats, clothes, stiffened for armour, and thinned for windows, screens, books, maps and money. The relative economy of paper compared to vellum meant that libraries of the Islamic world were vast. Islamic calligraphers wrote with bamboo quills on plant fibre paper smoothed over with chalk and wheat starch. Early European paper became very refined and resilient with the utilisation of old linen garments as opposed to unspun plant fibres. Coated with gelatine size it resembled valuable vellum for the writing of manuscripts, left unsized it was ideal for printing copperplate engravings. It was just such fine white paper that Gutenberg printed on using his intense black inks, with sensational results. When printer John Baskerville wanted to redesign his metal type in a refined and elegant manner he demanded a paper that was smooth and even, and purpose-made for letterpress. He collaborated with James Whatman, inventor of the wove mould, to develop a machine that could smooth and polish the surface of fine paper creating ‘hot pressed’ sheets.


What is Printmaking Paper? 

In theory you can print on any type of paper so long as ink will adhere to it. The paper that you choose will become integral to your work and if you experiment by printing the same plate on a selection of papers you will see how each makes a unique contribution to the finished result. Not only will the image vary but the overall feel of the print as an object will change with the weight and texture of the paper. Margins around the image and the edges of the paper traditionally remain on show. They differentiate the hand printed piece from a reproduction. Artists will commonly sign and edition the print in the margin and collectors will appreciate the choice of paper and whether a deckle edge remains or has been trimmed.


Composition

Generally speaking papers recommended for printmaking benefit from being strong and dimensionally stable, meaning they hold their size and shape well. The paper you select is likely to undergo ample handling and treatment. It might be picked up by the corners, left to soak in a water bath, squeezed through an etching press, vigorously rubbed with a baren or covered with multiple layers of silkscreen ink. Western papers with a high cotton content and Eastern papers formed with long plant fibres are perfectly suited to the rigours of printmaking. Alpha cellulose papers of high quality are manufactured for and trusted by printmakers around the world and less expensive papers such as cartridge work well, particularly for proofing. How the paper receives the ink is an important factor. Printmaking paper contains a lower amount of size than a watercolour paper, enabling the ink to penetrate the surface. Size is added to the pulp before forming the sheet, this ‘internal’ sizing renders the paper soft and absorbent in varying degrees depending on how much is added. Some printmaking papers contain no size at all and are referred to as ‘waterleaf’. If we outline the most common printmaking techniques we can see what stresses the paper is put through and what properties we might look for. It should be said though that many papers will print effectively across all print techniques and printmaking papers can work wonderfully with other artistic mediums.


Relief Printing

Relief printing includes linocut, woodcut, wood engraving, letterpress and collagraph. The print is taken from the ink on the block’s surface with the cut-away areas remaining unprinted. Printing can be done by hand or by press and you will want to consider the paper surface and how it makes contact with the ink, so a smoother surfaced paper, such as Fabriano Rosaspina, is ideal for relief printing. If printing is done by hand then lighter weight papers are ideal. Smooth surfaced papers by Zerkall and delicate washi papers such as Kozo and Kitakata will pick up the finest of detail. The silky delicacy of many washi papers belie their incredible strength, especially when dampened. They can withstand the pressure exerted by the printmaking baren as it rubs the back of the paper and still retain their shape. If you are experiencing picking of paper fibres when using fast drying water based inks, it is worth looking to try some of these resilient printmaking papers.


Intaglio Printing

Intaglio printmaking incorporates etching, engraving, drypoint, mezzotint and some forms of collagraph. Marks made in the plate hold the ink below its surface and when dampened paper is pressed down into the marks, the ink is transferred to the paper under the pressure of the press. The ink will penetrate the paper and an internal size that softens during soaking is ideal for this. The printing plate will be embossed into the paper along the image lines as well as all around its outer edge creating a ‘plate mark’. Papers used for intaglio need to be exceptionally strong even when damp, especially for printing multiple plate images which require passing the paper through the press several times. They need to be compressible and supple as well as being dimensionally stable such that they won’t distort and affect registration. The linen papers of Renaissance Europe perfectly fitted the bill and cotton papers of today come a close second, Somerset being just such a favourite. Much can be said for alpha cellulose papers in intaglio printmaking; for many years Hahnemühle have manufactured etching papers made from 100% alpha cellulose that are soft, pliable and very sensitive to detail.


Silkscreen and Lithography

Flat printing techniques where the ink and paper are on the same level are referred to as planographic and include lithography, silkscreen and monoprinting. Again many papers are suitable with a smoother surface working better for these techniques. In lithography strong papers with a high cotton content will help avoid picking, where a tacky ink can lift surface fibres from the paper, and internal sizing will allow the paper to absorb both the oil based ink as well as the water from the surface of the stone or plate. The smooth, absorbent Arches 88 was designed specifically for screen printing with oil based inks, it is ‘waterleaf’ with no size at all. However when laying down multiple layers of water-based screen ink, papers with a modest amount of surface size, referred to as tub sized, will cope best. Legion Coventry Rag and Somerset Tub Sized are examples of such.


L-R: 36gsm Awagami Kitakata, 300gsm watercolour paper


Considerations When Choosing a Paper for Printmaking


Fibres

100% cotton rag or ‘rag’ paper is how manufacturers describe paper made from cotton linter fibres. They are strong papers that retain their shape during printing, so are dimensionally stable, which is helpful when registering multiple plates for colour printing. Genuine rag papers, those made from the spun fibres of discarded garments, are rare and occasionally used for watercolour papers such as Jackson’s Two Rivers and Khadi 100% Rag. Papers made from a combination of cotton and wood cellulose make strong archival papers designed for printmaking. Plant fibres in Asian papers are naturally very long enabling incredibly strong papers to be made very thinly, if you try tearing a Japanese kozo paper you will appreciate its inherent strength. The type of fibre can affect how the ink penetrates the paper, and how the paper takes up water, a consideration to bear in mind across all print disciplines.


Surface

Surface texture can affect ink pick up as well as how your colour looks. A textured paper can work very well for deeply etched intaglio prints and a smoother paper can work better for lithography or silkscreen. How colour reflects from the surface of the paper will affect how bright it will appear. A more textured paper will bounce back the colour in a more diffused manner and look less bright than a smooth paper.


Sizing

Internally sized printmaking papers will be soft with a porous surface to take up the ink. Most size used today is synthetic as opposed to animal gelatine. Unsized waterleaf papers will be occasionally referred to as ‘copperplate’, will only require a sponge over or spray of water to dampen. These are better suited to oil based inks. You can tell if a paper has more or less size by touching it with the tip of your tongue. If your tongue sticks it is likely to have little or no size.


Edges

A genuine deckle edge occurs when the paper slurry slips between the mould and deckle of a hand formed sheet and is a beautiful aspect to hand made paper. These can be left in place and other edges torn down to compliment them depending on your registration system. You can tear down a machine made paper to create a similar effect. Of course if you want to register using the paper edges you will want to trim them off, ensuring that your edges remain perfectly square to one another.


Colour

This is a very subjective area with colour choices extending from radiant white to deepest black. Some printmakers love a bright white paper for their cool black inks and a warmer white for the browner blacks. Metallic inks look fabulous on a deep black paper such as Somerset Velvet Black.


Weight

Thinking about what and how you print will inform this aspect of your choice. A thicker etching plate or deep collagraph will need a thicker, heavier weight paper, perhaps over 300gsm to mould around the sculptural aspect of the plate and adequately emboss. A delicate drypoint on a thin plate could take a much lighter paper. A hand rubbed relief print will take less effort to execute on a lighter weight paper such as 36gsm Awagami Kitakata.


Preparing Your Paper

When it comes to preparing your paper for printing you will want to consider the margins around the image and what form of registration you are using. Traditionally the margins will be of equal width on both sides and above the image, with a slightly wider margin at the bottom. This gives the effect of the image being placed centrally on the paper, an optical effect especially evident if you sign and number your print in the bottom margin. If you are printing an intaglio you could be registering your plate on the press bed while holding the paper trapped under the top roller and the beautiful deckle edges can remain untrimmed. There are numerous forms of print registration and you can leave your paper edges, tear down or trim to a crisp straight edge accordingly. Some editioning studios will print with the paper larger than intended and trim down afterwards, this has the advantage of removing any unwanted inky finger marks or damage but can be costly.

If you are dampening your printing paper then each will have its own optimal soaking time depending on the amount of sizing, sheet thickness and fibre content. Cotton papers with their long fibres need to be dampened or soaked longer than wood cellulose papers because wood fibres will take up water faster. Waterleaf papers that contain no size will only need a sponge over or spray of water before stacking and covering to damp through. You want to achieve evenly dampened fibres throughout, the paper should feel limp and cold without any visible water remaining on the surface. A good way to ensure this is to prepare your paper the day before printing and form a damp pack.

A damp pack consists of wetting your paper either by dipping or sponging, creating a stack and wrapping it in plastic and placing under a board to add some weight. Any paper you do not use can be dried and then re-damped at a later date. This will avoid mould forming and staining your paper.

Your beautiful sheets of paper will be handled quite a lot during printing. Always use (at the least) two hands to avoid cockling the sheet. Large sheets are best picked up at diagonally opposite corners. After printing dry sheets can be hung up or placed on a drying rack. Dampened sheets will need flattening out during the drying process. Acid-free tissue should be placed over the image before placing the prints between sheets of blotting paper underneath boards to add weight. You can change the blotters periodically if required.


Printmaking Papers Comparison Table. Click to Zoom or download PDF to print.


Paper at Jacksonsart.com

Printmaking at Jacksonsart.com


The post Everything You Need to Know About Printmaking Paper appeared first on Jackson's Art Blog.

Linocut Printmaking for Beginners – What You Need to Get Started

$
0
0

There is something beautifully simple about the linocut process although the prints it produces can be extremely intricate and complex. A print is created by carving a design into a block of lino, rolling ink onto the surface and laying paper or fabric on top then applying pressure to produce a print. Like woodcut and wood engraving, it is a relief printing process. Lino was first used by artists at the end of the Nineteenth century, and really took off in the 1920s and 30s, when linoleum was developed for use as affordable flooring. Today, linocut is still very popular, and is often a way to get started in printmaking as there is no need for harsh chemicals or expensive equipment. It is also great fun and is suitable for all ages and artistic abilities.


Children’s hoops, 1936
Ethel Spowers
Gift of Rex Nan Kivell, 1953.
Te Papa Tongarewa Museum


Contents:

The Basics of Linocut Printing

Materials to Get Started With Linocut Printing


The Basics of Linocut Printing

Linocut printing involves cutting away from a block of linoleum, and inking and printing the uncut areas. When you place your carved, inked up block face down on a sheet of paper, the printed image will appear as a mirror image to how you have carved your block. Areas you have cut away will remain the white of the paper you print on.


Materials to Get Started in Linocut Printing

Pencil

It is a good idea to draw your design onto the lino block first, so a pencil is essential, although if you are feeling brave, you can cut into your lino without a guide. A slightly soft pencil works best as it creates a darker, more visible line.


Marker Pen

It is useful to go over your design with a permanent marker pen (e.g a Sharpie or waterproof pigment pen) so it doesn’t rub off easily. It will also help to make the lines clearer, which is useful while you are carving.


Carbon Paper

You can use carbon paper to transfer your design from a drawing or photo onto the lino.


Tracing Paper

Use tracing paper to draw around your original design drawing and flip it so it is back to front and prints correctly when carved. Use with carbon paper or a soft pencil rubbing to transfer the image onto lino.


back to top


Lino

Originally, artists would have carved the linoleum used for flooring, but this is no longer the case. The most common lino nowadays is grey lino, which is softer than the material used for flooring. It’s made with natural materials – linseed oil and cork – and is backed by hessian fabric. It’s biodegradable and comes in a variety of standard sizes from 7.5 cm x 7.5 cm to 40 x 60 cm. You can also buy it pre-mounted onto wood to make it extra sturdy (the majority of mounted lino is type high so you can use it alongside letterpress). It comes in single sheets, packs of 10 or in a large 900 x 1830 mm roll which means the block can be cut to your requirements. Grey lino can be a little stiff and hard, but heating it slightly – with a hairdryer, on a radiator or by sitting on it – so it is warm (not hot) ensures the carving process is much smoother. It is good to use a couple of blocks to explore mark making first, so a pack of ten in a smaller size is a good investment.

Other blocks commonly available are Softcut, Speedy Carve and Japanese vinyl. There are pros and cons with all of these materials. Softcut and Speedy Carve are softer and easier to carve, so they are better for smaller designs with less detail, like stamps for example. Japanese vinyl carves and prints more like lino, is PVC based and can be carved on both sides. With all of these surfaces, there’s nothing like a bit of trial and error to find out which is best suited to your way of working. You can read a detailed comparison of the materials here.


Carving Tools

Carving tools come in two basic shapes – U shaped gouges and V shaped cutters. The V shaped tools create thin, consistent lines, and the U shaped ones make bigger marks or clear areas around the design. Both tools come in various sizes from very small for detailed work to large for bolder marks and to quickly clear large areas.


Carving tools are available for all budgets, but it isn’t necessary to spend a lot of money on them. There are some budget options for beginners:
A plastic handle with interchangeable blades at different sizes
– A beginners set of woodcarving tools (they are suitable for all the blocks discussed here) – Jackson’s set of five tools are a great, inexpensive starter set.

I find the woodcut tools are easier to use than the interchangeable blades because they are more solid and easier to grip, but many artists do start with the handle sets.

Investing in more expensive carving tools will give you tools that can last a lifetime, if they are cared for and sharpened regularly. Pfeil make high quality Swiss made lino and block cutting tools that can be purchased individually or in sets containing a mix of U gouges and V cutters in various sizes. They have shaped wooden handles that fit the palm of your hand, so are comfortable to hold. Each tool is categorised by a number – e.g. 11/0.5 which refers to the curvature and the width of the blade in mm.


The C set has a good variety of wide and narrow tools, so is a good place to start if you are buying a set. Colin Blanchard’s article on Pfeil tools has more advice on how to choose.


Flexcut also make a great quality range of palm shaped tools. The lino and relief printing set contains a selection of carving tools and a slipstrop for keeping your blades nice and sharp (the slipstrop can also be bought separately). Sets contain mini tools for fine detail, micro tools for general carving and wide tools for clearing areas and larger work.


back to top


Sharpening tools

It is a good idea to keep your tools sharp – blunt tools do not carve efficiently and can increase the risk of accidents as they slip across the lino. Pfeil make a set of sharpening stones for cutting tools. Colin Blanchard’s article on sharpening tools is an excellent guide.


Ink

Relief printing ink is designed to roll onto the block smoothly and print evenly. Water-based and water-soluble relief inks are easy to use and clean up with soap and water. You only need one ink colour to get started with linocut printing, but there’s nothing to stop you from exploring with multiple colours from the start.

There are a variety of different types and brands of relief ink, and they fall into the following three main categories.


Water-based ink

Water based inks are easy to clean up and dry relatively quickly. They come in varying qualities from student grade, with less pigment, to artist quality with high lightfastness. For a beginner, they are a great choice. If you are looking for small tubes with a range of colours to experiment with, Schmincke’s Aqua linoprint ink has five 20 ml tubes. The colours are rich and they dry in 20 minutes. They are a good choice if you would like to try printing in different colours without buying lots of big tubes.


back to top


Water soluble oil based ink

Water soluble oil based ink can be cleaned up with soap and water, unlike traditional oil based inks. This means they have the richness of colour associated with traditional printmaking inks, without the need to use solvents such as turpentine or white spirit. Cranfield Caligo Safe Wash Relief Ink are a good quality range of printmaking inks that are good for beginners and seasoned printmakers alike.


Oil based ink

Traditional oil based ink contains a high level of pigment, mixed with an oil such as linseed oil. Their rich colours make them particularly good for large areas of colour or for printing onto dark paper (metallic colours work very well on black). Cranfield Traditional Relief Inks come in a wide range of colours, including gold and silver. Harsh solvents can be avoided when cleaning up by using vegetable oil and newspaper or a rag, then wiping with a plant-based solvent like Zest-it.


Can I use other inks for relief printing?

There are different inks for different printmaking techniques which broadly fall into three categories – relief, intaglio and screenprinting. The crucial difference between them is the consistency. Screenprinting ink is very loose and runny, relief ink is thicker and more viscous so it can be rolled out, and intaglio (often called etching) ink is stiff and tacky so it clings to the plate while it is pushed around. For best results with linocut, stick to a relief printing ink.


Inking Slab

In order to apply an even distribution of ink on your roller, the ink is first rolled into a thin layer on a surface before inking the lino. This can be an inking slab, glass chopping board or acrylic sheet.


back to top


Roller/Brayer

A relief printing roller or brayer is made of natural or tough synthetic rubber and has a handle. It is used to apply a thin layer of ink to the linocut block.


It is possible to buy a good starter roller for under £10. They come in a variety of sizes, weights and qualities. Using a roller that is wider than the block will make it easier to apply an even layer across your whole block. If your roller is narrower than your block, you might get some lines from the imprint of the edge of your roller, but with some extra rolling these can be inked away.

The Esdee soft lino roller is a good starter roller, as it is made of soft synthetic rubber and gives an even coverage. Cleaning them thoroughly after use and storing them with the rubber facing up will prolong their lifespan and help the roller keep its shape for longer.

The shore value on some rollers refers to their softness – hard is over 50 shore and soft under 50 shore. For relief printing, a soft rubber roller is recommended, as they are better at covering the carved detail on the lino block. The Japanese soft rubber roller is a good quality roller that comes in a variety of sizes.


Printing Press/Baren

To make a print you must apply pressure to transfer the image from the inked block to the paper. For this, you can use a printing press, but that is not always necessary, particularly for prints on thin paper. A baren is a smooth, round, flat disc with a handle on the back, which is rubbed onto the back of the paper to transfer the image from the lino. An inexpensive Japanese bamboo baren is a lovely tool for starting out, but the back of a spoon can also be used for hand burnishing.


Paper

There is a wide variety of printmaking papers available. Specially made printmaking papers are less absorbent than drawing and watercolour papers and tend to be smooth. Japanese Washi papers, although strong, are very thin, and are very well suited to hand burnishing techniques because they are easy to manipulate in the hand for positioning, and don’t require much pressure when taking a print. Thicker western printmaking papers such as Zerkall, Stonehenge or Fabriano Rosaspina are thicker, and well suited to printing with a press.


You might have some cartridge paper or everyday printer paper spare, which can be used for practice prints, as it is smooth and thin, and will not require much pressure to get a good print. Textured papers such as rough or cold-pressed watercolour paper should be avoided, unless you are specifically seeking a textured effect, as they do not pick up the ink evenly. For more information, see our article on Everything You Need to Know About Printmaking Paper.


The wonderful thing about linocut is that you need very little in terms of tools and accessories – so it is a great way to get creative at home. There is something magical about the whole process and seeing your image turned into a print is really exciting. Once you get the hang of creating simple prints, there are so many possibilities. Linocut can also be combined with other techniques such as monoprint, watercolour or collage. All you need is the corner of a table, some basic supplies and you’re all set.


back to top


Further reading


Books

Linocut for artists and designers

Beginners guide to linocut


Jackson’s blog

Make Your Own Linocut Christmas Cards

Paul Wilkins Reviews Pfeil Linocut Tools

Printmaking with Rubber Stamps

Sharpening Linocut Tools by Colin Blanchard

Casting a Spell: Image Making With Screenprint, Linocut and Gold Leaf by Colin Blanchard

Hand Printing With Schmincke Linol Inks

Everything You Need to Know About Printmaking Paper


The post Linocut Printmaking for Beginners – What You Need to Get Started appeared first on Jackson's Art Blog.

Viewing all 92 articles
Browse latest View live